
Running Order
Managing running orders
In Naviga Plan Setup, system managers create ad sections. These are the topical Sections and Categories assigned to ads as they are booked in the ad booking system. Sections may or may not correspond to editorial sections.
After creating the ad sections, the system managers then create sets of running orders. Running orders tell Naviga Plan how the ads are supposed to flow, placing the ad sections in a hierarchy/tree structure. For example, under Classified, the first level of category may be named Automobiles, the second level may be named New, and under that may be named SUVs.
In the Ad booking system, when each ad is booked, the rep designates the category tree and category to which the ad belongs. For example, a new Honda CRV might be assigned to Classified > Automobiles > New > SUVs.
Each product normally has its own set of running orders. Newspaper planners use the running orders to assign one or more ad sections to each page in a plan. This determines which types of ads can be placed automatically on which pages in a plan. A page that is designated Automobiles would have all classifications under Automobiles eligible to be placed on that page.
Sections do not have to be assigned to consecutive pages. For example, ROP ads might appear on pages A2-A8, B2-B4, B7-B12, and D8.
Each ad that has been assigned a section can be placed automatically on pages that have been assigned that section. However, an ad can be manually placed on or moved to a page that does not have the same section as the ad.
Ad section designations are independent of editorial section designations. For example, you may create an ad section—Recreation ROP—that is assigned to pages in the Sports editorial section in some editions but assigned to the Recreation editorial section in larger editions.
Each section has been assigned a set of layout parameters called a pagination style. These parameters are defaulted from what is set in Plan Setup, but can be overridden in Naviga Plan.
Assign a section or a classification to a page
With the plan open, do one of the following:
From the Plan menu, choose Layout -> Running Order.
Press Ctrl+Shift-R (Windows) or Command+Shift-R (Mac OS). The Classification Running Order list opens.
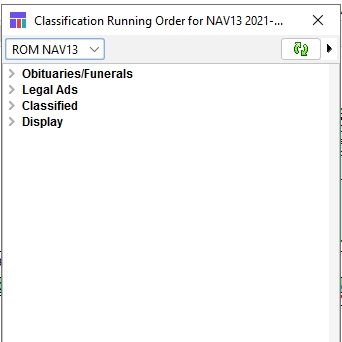
From the popup, select the set of running orders you want to apply to the plan.
Note: You can use more than one set of running orders in a plan.
The sections appear in a tree structure.
Click the > to the left of the section name to expand the section list levels.
Select the ad section you want to apply to the page and drag and drop it on the page. Note: If you drag and drop the ad section onto the page-set name bar above a page, the ad Section applies to every page in that page set. Two indicators appear to tell you that the section has been assigned to that page/page set:
The section icon (
 ) appears below each page that has been assigned one or more ad sections. When you place your cursor on a section icon, the list of sections assigned to that page appears in the Plan information bar.
Each ad Section assigned to one or more pages appears in boldface in the Classification Running Order list.
Continue dragging and dropping ad sections onto pages until you are done.
Close the Running Order list.
Unassign sections from a plan
You can unassign a section from all pages in the plan.
Note: This does not remove the section from the Running Order list. It can be reassigned to pages in the plan.
With the plan open, do one of the following:
From the Plan menu, choose Layout -> Running Order.
Press Ctrl+Shift-R (Windows) or Command+Shift-R (Mac OS). The Running Order list appears.
From the Running Order List, select the section you want to remove from the plan.
Note: You can remove only sections or classifications that have been assigned to pages in the plan. For example, if the plan has been assigned the section Classified but no subclassifications, you cannot select Real Estate and remove only that classification.
In the Running Order menu, choose Remove Section > All.
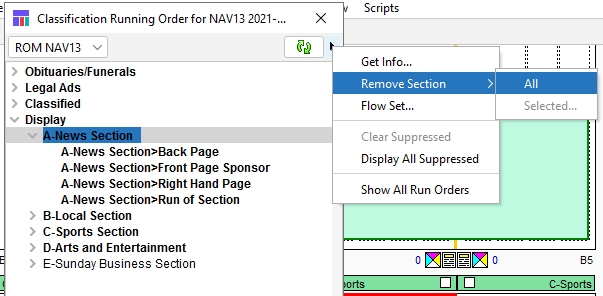
Note: The feature Remove Section > Selected is not available in this version.
Note: To remove a classification from a single page use the Page Attributes dialog box (right click on the selected page and then pick “info” then select the section from the Classifications tab and select “Remove”)
View or override pagination styles
Use pagination styles to apply layout characteristics to each ad section and classification. Characteristics include planning style, stacking preferences, sort order, header placement, use of rules, gaps between ads, justification, and others.
There are usually separate pagination styles for ROP ads, classified ads, and square-off ads, as well as any others your site might use.
Your site creates and maintains pagination styles in Naviga Plan Setup, where they also assign them to ad sections.
In the Plan application, you can view or override the characteristics for any pagination style.
Important: Overriding a pagination style affects the pagination style for this plan only. It does not affect the characteristics for the same pagination style in other plans.
With the plan open, do one of the following:
From the Plan menu, choose Layout -> Running Order.
Press Ctrl+Shift-R (Windows) or Command+Shift-R (Mac OS). The Classification Running Order list appears.
Do one of the following:
Double-click an ad Section.
Select an ad section. In the Classification Running Order menu, choose Get Info.
 The Pagination Styles Override dialog box appears. It has five panels. The General panel is active
General dialog box
Planning Style
Run of
Paper
Distributes display ads among all pages defined as Run of Paper. This option also displays all ROP (Run of Paper) ads in the same color.
Classified Top Down
Stacks display ads at the top of their assigned classified category. Liners flow beneath the display ads according to the sort order you select for classifications.
Note: This planning style is a European style.
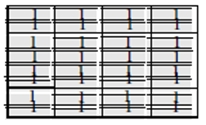
This example of Classified Top-Down planning style shows the flow of display ads and liners for three possible classifications
Classified Down Up
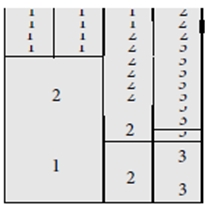
Stacks display ads at the bottom of the page, as close to their Classified category as possible. Liners flow above the display ads according to the sort order you select for the class. This example of Classified Down Up planning style shows the flow of display ads and liners for three possible classifications.
Left Right
Sort ads of the same size across the page from left to right.
Important: Only use this option if every ad is the same size. Traditionally this is used for classified display ads, such as a block of real estate display ads. It can also be used for liners, such as for tabular‐layout ads.
Note: The look ahead feature is disabled when using this planning style since the ads are expected to be the same size…there is no reason to look ahead for a better fit.
Left Right Uneven
Similar to ‘left right’ above but the ads can be different sizes. Works best when ad heights are multiples of each other. Ie 1/8 page, ¼ page, ½ page, full page.
Note on using this: the sort text will be replaced with a width size code, followed by a depth size code, followed by the client’s name. This will sort similarly sized ads together to allow for better left-right flowing of the ad. The ads will no longer be in alpha order with this planning style, but rather sorted according to size.
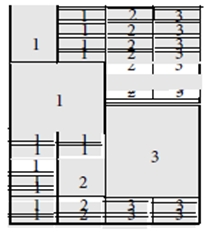
Classified Up Down
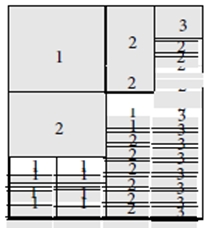
Stacks display ads at the top of the page, as close to their classification. as possible. Liners flow below the display ads according to the sort order you select for classifications. This example of Classified Up Down planning style shows the flow of display ads and liners for three possible classifications
ROP Layout
Use to select ad stack preferences. Naviga Plan honors the ROP Layout preferences first, then the Planning Style.
Distribution
Spread
Spreads ads out evenly among all the pages in each classification, with a balanced appearance of large and small ads.
Packed
Flows all the large display ads toward the front of each classification, leaving room for liners in the back.
Backwards
Off
Select “off” to disable this option
Height
Select Height if you want to plan the pagination style from back to front. Only use this pagination style for liners. This will leave a horizontal space at the beginning of the section, where the editorial department can place a story, or where you can place advertorial text.
Note: Using this option is often time consuming and difficult for the system.
Note: Plan Backwards only works if you do not plan ads again
Column
Select Column if you want to plan the pagination style from back to front. Only use this pagination style for liners. This will leave a Vertical space at the beginning of the section, where the editorial department can place a story, or where you can place advertorial text.
Square Off
None
Ads in a classification using this pagination style are not squared off.
Top Left
Ads in a classification using this pagination style are squared off to the top left side of the page.
Top Right
Ads in a classification using this pagination style are squared off to the top right side of the page.
Bottom Left
Ads in a classification using this pagination style are squared off to the bottom left of the page.
Bottom Right
Ads in a classification using this pagination style are squared off to the bottom right of the page.
Square Off Columns
Indicate how many columns of ads to square off.
Square Off Depth
Indicate how deep to square off ads. (typically, will use one or the other between columns and depth)
General Options
Display Ads First
Check to plan display ads before liners.
Sort Displays Alphabetically
Check to plan ads in alphabetical order.
Color Out of Order
Check if you want a liner to run on a color page even if it runs in a different classification.
This option creates scatter ads in publications that run unrelated ads together. For example, an auto ad might run above a house‐for‐rent ad.
Jumps
Check if you want this classification to use jumps if needed. When a classification has a gap of at least one page, a jump will automatically be added at the end of the first page “[Section] continued on page xx” and the beginning of the next page that has that Section “[Section] continued from page xx.”
This class only check box
Check if you want this setup to apply to this classification only. Otherwise, it will apply to all setups.
Reset button
Resets characteristics in all panels to the way they were set up in Naviga Plan Setup.
Cancel button
Cancels all changes in all panels. Does not reset but returns to last overrides saved.
OK button
Saves overrides.
Make any changes you want in the General panel.
Rules Dialog Box
Click the Rules tab.
Make any changes you want in the Rules panel.

Measurement Units
Select the units of measurement to be used in setting rule weights: points, inches, millimeters, centimeters, didots, ciceros, picas.
Rule Weight
Display Ads Liners Fillers Headers Banners Page Tops Page Bottoms Columns
Enter a weight if you want rules for the item type in the classifications assigned this pagination style. If an item’s rule weight is 0.0, no rule will print. Rules print between items. In some situations, they also print above the first item and below the last item.
Ignore the Custom ID column – not relevant to this version of Plan
Center Rules
Check if you wish for the rule to be centered within the column
Extend rules to rules
This is useful when there are column (vertical) rules and row (horizontal) rules and you wish for the rows to extend to the columns. Example:

No Rules Before Display Ads
Check if you do not want rules placed before display ads.
No Rules at End of Column
Check if you do not want rules placed at the bottoms of columns.
No Rules Between Ads and Headers
Check if you do not want rules placed between ads and headers.
No Rules Between Ads and Fillers
Check if you do not want rules placed between ads and fillers.
In Split ads
Check if you do not want rules placed when ads are split. Example - this shows ads at end of columns, but not if the ad was split:

This class only
Check if you want this setup to apply to this classification only. Otherwise, it will apply to all classifications.
Reset button
Resets characteristics in all panels to the way they were set up in Naviga Plan Setup.
Cancel button
Cancels all changes in all panels. Does not reset but returns to last overrides saved.
OK button
Saves overrides.
Beside Headers
currently only displayed in setup, Paginations
Click this if you do not wish to have rules beside column headers. Here is an example:

Gaps Dialog Box
Click the Gaps tab. The Gaps panel opens.

Cropping is part of a feature where two half page ads will be cropped with a small amount off the top / bottom of both. It is displayed here, but not editable by the end user. It is configured in Plan Setup.
Measurement Units
Use to select the units of measurement to be used in setting gaps: pts, in, mm, cm, di, ci, pi.
Display Ads Above/Below
Enter gap measurements if you want gaps above and below display ads in the sections assigned this pagination style.
Liners Above/Below
Enter gap measurements if you want gaps above and below liners in the sections assigned this pagination style.
Fillers Above/Below
Enter gap measurements if you want gaps above and below fillers in the sections assigned this pagination style.
Headers Above/Below
Enter gap measurements if you want gaps above and below headers in the sections assigned this pagination style.
Banners Above/Below
Enter gap measurements if you want gaps above and below banners in the sections assigned this pagination style.
This class only check box
Check if you want this setup to apply to this section only. Otherwise, it will apply to all setups.
Reset button
Resets characteristics in all panels to the way they were set up in Naviga Plan Setup.
Cancel button
Cancels all changes in all panels. Does not reset but returns to last overrides saved.
OK button
Saves overrides.
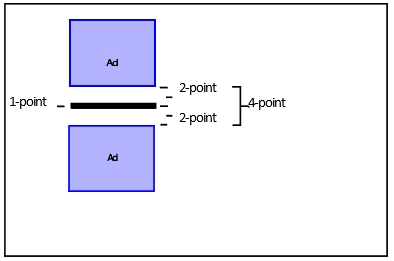
Any rule between items overlays the total ad gap between those items; it does not increase the total ad gap. For example, if you designate a one-point rule between each ad, a two-point gap above each ad, and a two-point gap below each ad, the total gap between two ads is still four points.
The position of the rule relative to the two ads is designated in Naviga Plan Setup.
Make any changes you want in the Gaps panel.
The Justify Dialog Box
Click the Justify tab
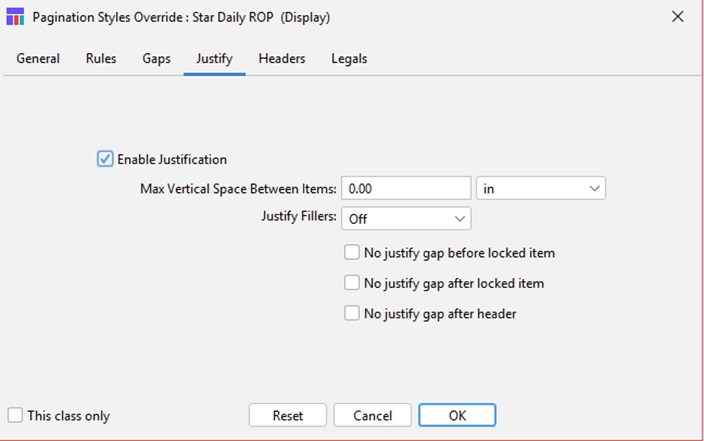
The Justify panel opens.
Make any changes you want in the Justify panel.
Enable Justification
Check to enable editing on this panel
Max Vertical Space Between Items
Enter the limit of the amount of vertical space that can be placed between items to achieve justification. This does not include fillers.
Measurement Units
Use to select the units of measurement to be used in setting the justification limit: pts, in, mm, cm, di, ci, pi.
Justify Fillers
Select where you want fillers inserted to justify the ad layout: Off, End of Column, or Random.
No Justify Gap before locked item
Select to not add a gap before locked item
No Justify Gap after locked item
Select to not add a gap after a locked item
No Justify Gap after header
Select to not add a gap after a header
This class only
Check if you want this setup to apply to this classification only. Otherwise, it will apply to all setups.
Reset button
Resets characteristics in all panels to the way they were set up in Naviga Plan Setup.
Cancel button
Cancels all changes in all panels. Does not reset but returns to last overrides saved.
OK button
Saves overrides.
Headers Dialog Box
Click the Headers tab.
The Headers panel opens.
Make any changes you want in the Headers panel.
Click OK to close the Pagination Styles Override dialog box.
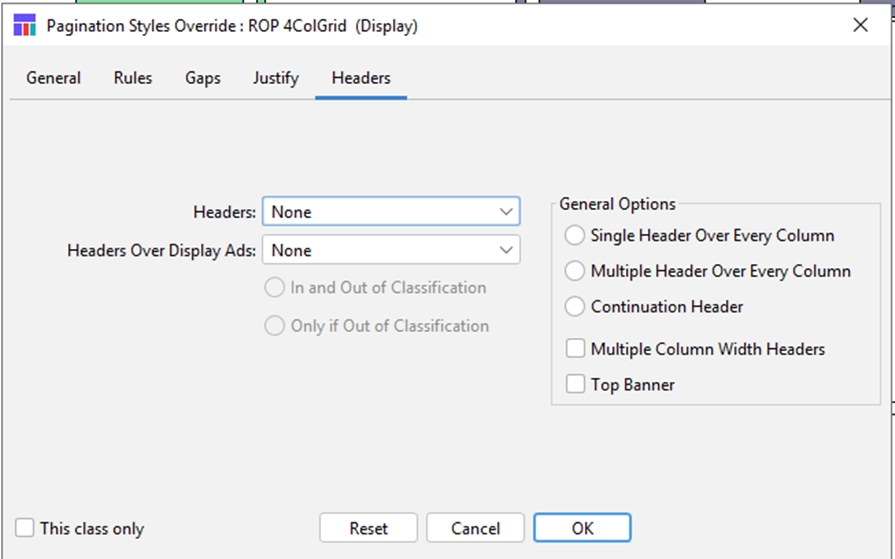
Headers:
None
Headers will not appear above any classifications using this pagination style. Select this when you are using the Left Right planning style.
If needed
Headers will appear for each classification using this pagination style that has at least one ad.
Always
Headers will appear for any classification using this pagination style, even if there are no ads.
Headers over Display Ads:
None
Headers will not appear above display ads for any classification using this pagination style.
Always
Headers will always appear above display ads for any classification using this pagination style.
As Required
Headers will not appear above display ads for any classification using this pagination style if they are run in their classification. Headers will appear above display ads if they are run in a different classification.
In and Out of Classification
Not available in this version.
Only if Out of Classification
Not available in this version.
General Options:
Click on One:
No button ‐ 0
Places headers only over the beginning of each classification.
Single Header Over Every Column
Click if you want a single‐column classification heading to appear over every column of a classification. Uncheck if you want the heading to appear over only the first column of a classification. This feature is usually used to save newsprint.
Multiple Header Over Every Column
Click this button to combine multiple single‐column headers that belong to the same classification into one multiple column header.
Continuation Header
Click this button if you want a classified header repeated at the top of a subsequent page. This is usually used when a header is only placed at the beginning of each classification, rather than at the top of every column.
Multiple Column‐Width Headers
Check this check box to allow multiple‐column headers.
Top Banner
Check this check box if you want a top banner for this pagination style.
This class only check box
Check if you want this setup to apply to this classification only. Otherwise, it will apply to all setups.
Reset button
Resets characteristics in all panels to the way they were set up in Naviga Plan Setup.
Cancel button
Cancels all changes in all panels. Does not reset but returns to last overrides saved.
OK button
Saves overrides.
For all changes in this popup:
To have the changes take effect, unplan the plan. See Unplanning plans, pages, and sections.
Replan the plan. See Planning ads.
You have overridden the characteristics for the selected pagination style for this plan only...it will not change the setup
Note: You can suppress individual headers so the next time the plan is planned they do not appear. See Suppressing ad headers.
Managing flow sets
You can create flow sets, designating sections, then apply them like custom running orders.
When you select pages and apply a flow set, it has priority over the plan’s running orders on those pages.
Flow sets are stored for each user and are not available to other users.
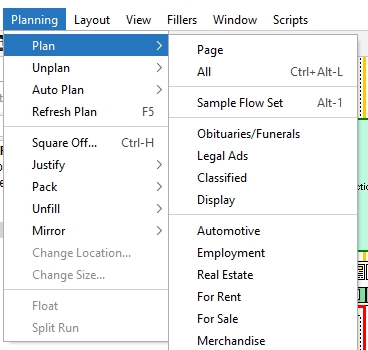
Your flow sets appear in the Planning -> Plan menu, where you can select them. See Planning ads automatically. They also appear in the Planning -> Unplan menu. See Unplanning plans, pages, and sections.
If you plan with a flow set, you can undo it by using Edit -> Undo or by selecting Planning -> Unplan -> and then selecting your flow set.
With a plan open, do one of the following:
From the Plan menu, choose Layout -> Running Order.
Press Ctrl+Shift-R (Windows) or Command+Shift-R (Mac OS). The Classification Running Order list appears.
In the Running Order popup, select the running order on which you want to base the flow set.
Open the Running Order menu by clicking the Menu icon (
 ).
).Choose Flow Set. The Flow Set Editor opens.
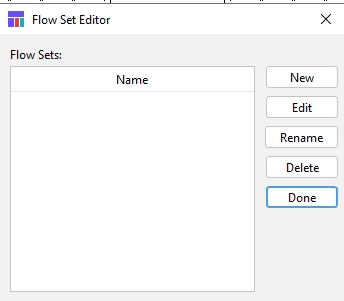
To create a new flow set, click New. The Flow Set Name dialog box opens.
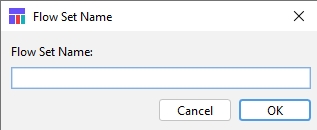
Enter the name of the new flow set.
Click OK. The Flow Set Order Editor opens.
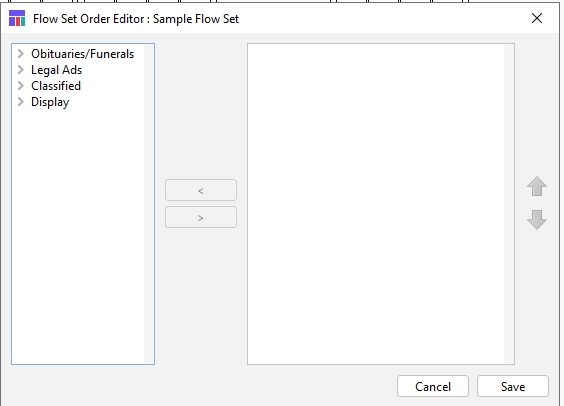
To add a Section to the flow set, select it from the left column.
Click the Add arrow (
 ).
).Continue adding classifications.
To remove a classification, select it from the flow set and click the Remove arrow (
 ).
).To move a section up or down in the list, select it and click the up and down arrows to the right.
When you are done, click Save.
To edit a flow set, select it in the Flow Set Editor and click Edit. The Flow Set Order Editor opens.
To rename a flow set, select it in the Flow Set Editor and click Rename. The Flow Set Name dialog box opens.
To delete a flow set, select it in the Flow Set Editor and click Delete.
When you are finished, click Done.
Suppressing ad headers
You can suppress headers when you want to, see a list of suppressed headers, and restore them. Headers can also be controlled by setting overrides for them.
To suppress headers from the plan layout
Sometimes a classification has a header on the page but no ads. You can suppress the header, so it does not print.
Select the header you want to suppress.
Right-click (Windows) or Control-click (Mac OS) and choose Suppress.
Unplan the page. See Unplanning plans, pages, and sections.
Replan the page. See Planning ads.
The classification header no longer appears in the plan.
Note: If you right-click (Windows) or Control-click (Mac OS) on the header, then choose unplan from the menu, the header disappears, but as soon as you replan the header reappears.
To see a list of suppressed headers
You can manage suppressed headers by using the Display All Suppressed dialog box. This displays a list of all the classifications that have any suppressed headers attached.
With a plan open, do one of the following:
From the Plan menu, choose Layout -> Running Order.
Press Ctrl+Shift-R (Windows) or Command+Shift-R (Mac OS). The Classification Running Order list appears.
Open the Running Order menu by clicking the Menu icon (
 ).
).Choose Display All Suppressed. The Display All Suppressed dialog box appears.
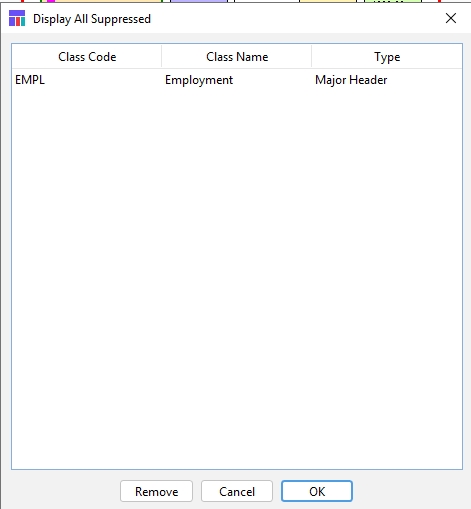
To remove a selection, click on the row and click Remove.
When you are done, click OK.
To restore headers to the plan layout
You may want to restore a suppressed header.
Do one of the following:
From the Plan menu, choose Layout -> Running Order.
Press Ctrl+Shift-R (Windows) or Command+Shift-R (Mac OS). The Classification Running Order list appears.
From the Run List, select the Section whose header you want to restore.
In the Classification Running Order menu, choose Clear Suppressed.
Unplan the page. See Unplanning plans, pages, and sections.
Replan the page. See Planning ads. The selected header appears in the plan.
Last updated
Was this helpful?