
Page Sets
Inserting page sets in a plan
You can insert a new page set before, after, or between two existing page sets, or you can insert a page set within an existing page set, making it a nested page set.
Note: You can nest more than one page set within another page set.
Click on a page adjacent to the point at which you want to insert the new page set.
Do one of the following:
From the Plan menu, choose Pages -> Page Set -> Insert.
Press Ctrl-Shift-I (Windows) or Command+Shift-I (Mac OS).
The Page Set Insert dialog box opens.

Insert pages:
Insert pages
The number of pages to insert as a page set in the plan.
Insertion Position
Select the position in which to insert the pages: After Page, Before Page, At start of plan, At end of plan.
Page Number
Enter the page number relative to where the insertion should occur.
Section Letter
The section letter of the page you selected before opening the Page Set Insert dialog box (read only).
Name
Enter the name of the new page set.
Section Letter
Enter the section letter designation. This can be a letter new to this plan or an existing letter.
Start in new spread check box
Check to start the new page set in a new spread. If the first page of the page set page would be a right‐hand page in a spread, the spread will appear split on the Plan layout.
Numbering popup
Use to select the method of numbering the page set: by plan, page set, section letter, offset, or sequence. See Numbering pages.
Press Run popup
Select the press run for this page set (if configured in Plan Setup).
Ad Section popup
Select the ad section to assign to the inserted pages.
Folios:
Folio Left popup
Select the folio style for left‐hand pages. This will only be displayed if your system administrator has configured folios in Naviga Plan Setup. This setting will select the indd template for the Left-Hand pages.
Folio Right popup
Select the folio style for right‐hand pages. This will only be displayed if your system administrator has configured folios in Naviga Plan Setup. This setting will select the indd template for the Right-Hand pages.
Filename Pattern
Use to select the filename pattern for outputting the page set. The file name pattern is set up in Naviga Plan Setup
Note: If the filename pattern includes the page set name, be sure you have named the page set.
Multi-Page Document
This is controlled by Print Production in NCS Content. For non-NCS Content customers, this will not be functional.
Cancel button
Cancels changes and closes the dialog box.
OK button
Inserts the pages and closes the dialog box.
In the Pages text box, indicate the number of pages you want to insert.
From the Insert popup, choose where you want the insertion to occur, before or after the page number you enter.
In the Page Number text box, indicate the page number where you want the insertion to occur.
Click OK.
The new page set is now inserted into the plan.
You can also nest pages in a page set by assigning the pages to another page set in the plan.
Note: You can also insert pages in a page set that become a part of the page set.
Understanding nested page sets
You can insert or “nest” a new page set within another page set in the plan.
A nested page set maintains its independence. It has a distinct name, can be numbered separately, and the page set name bar has its own color. The only difference from non-nested page sets you insert before or after other page sets is that the nested page set is in the middle of another page set.
For example, you might want to use a nested page set to allow for an advertising insert. The Sports page set might consist of pages numbered 1 through 8. In the middle you might nest a two-page advertising page set, numbered 1 and 2. When the reader removes the advertising page set, the Sports page set is still numbered correctly.
You can nest more than one page set within a page set.
The nested page set does not affect the host page set in which it is nested. The now separated parts of the original page set still share the same name, numbering, and the page set name bars still share the same color.
If you set all page sets, including the nested page set, to number by plan or number by section, the numbers run continuously by plan or section letter, including the nested page set.
If you set all page sets, including the nested page set, to number by page set, each page set numbers independently.
If you set the nested page set to number by page set and all other page sets to number by plan, the nested page set begins with 1, while the other page sets number continuously, as if the nested page set did not exist. See Numbering pages.
Page sets Setups
A plan contains all the pages that are published in an issue or product. Each plan consists of one or more-page sets. Each page set consists of one or more pages.
You can designate a page set in several ways, according to your publication’s naming conventions. These include a name (which will show in the title bar of each page in the page set when viewed in Plan), and a section letter or letters. See Changing information about a page set.
You can nest page sets by inserting one between the pages of another. See Understanding nested page sets.
Numbering pages
You can number the pages in a page set in one of five ways. You can choose only one numbering scheme per page set, though some choices, such as numbering by plan or section, can affect the numbering in other page sets.
Select a page in the page set.
Do one of the following:
Choose Pages -> Page Set -> Setups.
Press Ctrl+Shift-U (Windows) or Command+ Shift-U (Mac OS). The Page Set Setups dialog box opens.
From the Numbering popup, choose one of the following:
Number by plan
Numbers the pages in the selected page set relative to their position in the entire plan,
Number by page set
Numbers the first page in the selected page set as page 1, without affecting other page sets in the plan.
Number by section
Numbers all page sets with the section letter consecutively, beginning with page 1. This is similar to Number by Page Set but is useful if once section has more than one page set, but you want the numbering to be continuous throughout the section.
Number from offset
Numbers the selected page set with a starting page number other than 1, such as when you want to pick up numbering where a previous publication left off. A text box opens next to the Numbering popup. Type the start number in the text box and press OK.
Number by Sequence
If this is selected, it numbers the page set according to the page set letter and the actual page number in the plan. For example, if you are looking at the first page in D, but it is the 13th page in the plan, it will display as D13.
Changing information about a page set
You can change the name or letter of a page set, specify page numbers, and make other designations for a page set.
In the Plan, select a page in the page set.
Do one of the following:
In the Plan menu, choose Pages -> Page Set -> Setups.
Press Ctrl+Shift-U (Windows) or Command+Shift-U (Mac OS).
The Page Set Setups dialog box opens.
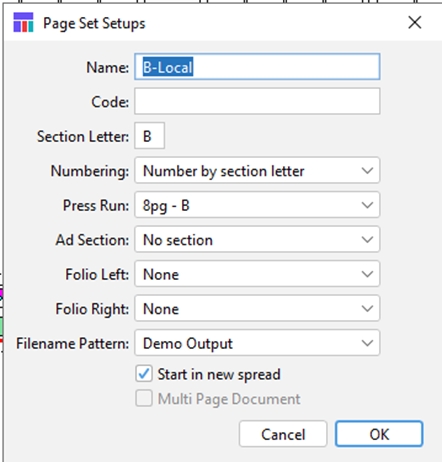
Name
Enter the name of the page set. The name will appear above each page in the page set.
Code
Enter page set code
Section Letter
Enter the section letter designation of the page set. This can be a letter new to the page set or a letter already in the plan.
Numbering
Use to select the method of numbering the page set by plan, page set, section letter, or offset. See Numbering pages.
Press Run
Use to select the press run for this page set.
Ad Section
Use to select the ad section you want to apply to the new page set.
Folios:
Folio Left
Select the folio style for left‐hand pages. This will only be displayed if your system administrator has configured folios in Naviga Plan Setup. This setting will select the indd template for the Left-Hand pages.
Folio Right
Select the folio style for right‐hand pages. This will only be displayed if your system administrator has configured folios in Naviga Plan Setup. This setting will select the indd template for the Right-Hand pages.
Filename Pattern
Use to select the filename pattern for outputting the page set.
Note: If the filename pattern includes the page set name, be sure you have named the page set.
Start in new spread check box
Check to start the page set in a new spread. If the first page of the page set page will be a right‐ hand page in a spread, the spread will appear split on the Plan layout.
Cancel button
Cancels and closes the dialog box.
OK button
Splits the page set and closes the dialog box.
To change the name of the page set, enter the new name in the Name text box.
To change the section letter designation of the page set, enter the new letter in the Section Letter text box. This can be a letter new to the page set or an existing letter.
In the Numbering popup, choose a numbering scheme. See Numbering pages.
To add an additional ad section assigned to the page set, select a section from the Ad Section popup.
NOTE: To remove sections that are already there, use the page info screen or the running order’s Remove Section option. If you choose to do it one page at a time, you can multi-select pages and do it a little faster.
Splitting a page set
You can split a page set into two page sets.
Note: You cannot split a nested page set.
Important: Be certain no one else is working in the page set before splitting it. If anyone has any pages checked out, you cannot split the page set. If anyone is working in the page set in InDesign, you can split the page set but editorial matter may be affected.
To split a page set:
In the Plan, select a page in the page set you want to split.
Do one of the following:
From the Plan menu, choose Pages -> Page Set -> Split.
Press Ctrl+Shift-Y (Windows) or Command+Shift-Y (Mac OS). The Page Set Split dialog box opens.
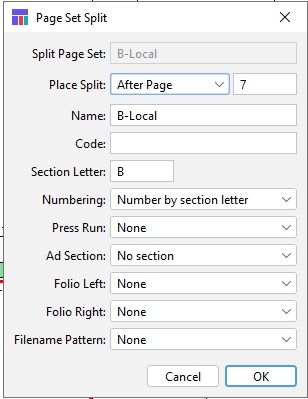
Split Page Set:
Split Page Set text box
The active page set—the page set that will be split.
Place Split
Use to select where to insert a split.
Page Indicator
Enter the page number relative to where the insertion should occur.
Name
Enter the name you want to give the new page set.
Section Letter
Enter the section letter designation, existing or new, you want to give the new page set.
Numbering
Use to select the method of numbering the page set: by plan, page set, letter, offset or sequence. See Numbering pages.
Press Run popup
Use to select the press run for this page set.
Ad Section popup
Use to select the ad section you want to apply to the new page set.
Folios:
Folio Left popup
Select the folio style for left‐hand pages. This will only be displayed if your system administrator has configured folios in Naviga Plan Setup. This setting will select the indd template for the Left-Hand pages.
Folio Right popup
Select the folio style for right‐hand pages. This will only be displayed if your system administrator has configured folios in Naviga Plan Setup. This setting will select the indd template for the Right-Hand pages.
Filename Pattern popup
Use to select the filename pattern for outputting the page set.
Note: If the filename pattern includes the page set name, be sure you have named the page set.
Cancel button
Cancels and closes the dialog box.
OK button
Splits the page set and closes the dialog box.
From the Place Split popup, choose whether you want the split to occur before or after the page number you enter.
In the Page Indicator text box, enter the page number where you want the split to occur.
In the Name text box, enter the name (up to 32 characters) you want to give the split-off page set. It must be different from the name of the original page set. Note: If in the Place Split popup, you selected Before Page, the page set before the split will have the new name. If you selected After Page, the page set after the split will have the new name.
For details on the other items, see Changing information about a page set. For details on page numbering, see Numbering pages.
Click OK.
The page set is split with the second part assigned the new name and information.
Assigning pages to a page set
You can assign selected pages to a new page set or to an existing page set.
Important: Be certain no one else is working in either the source or the target page set before assigning pages. If anyone has any pages checked out, you cannot assign pages.
In the Plan, select the pages you want to assign to another page set.
Do one of the following:
In the Plan, click the Assign Page Set icon (
 ).
).From the Plan menu, choose Pages -> Page Set -> Assign.
Press Ctrl+Shift-G (Windows) or Command+Shift-G (Mac OS). The Assign Page Set dialog opens
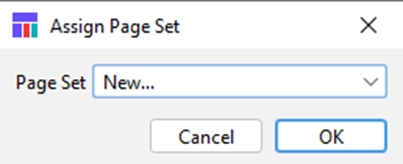
Do one of the following:
To assign the selected pages to a new page set, in the Page Set popup select “New...” and click OK. A second kind of Assign Page Set dialog box opens. Complete it as you would the Page Set Update dialog box.
To assign the selected pages to an existing page set, in the Page Set popup select the page set.
Click OK.
The pages are assigned to the selected page set.
Note: You can assign one or more pages inside a page set to another page set, which “nests” the pages. See Understanding nested page sets.
Deleting page sets
You can delete a page set from a plan.
Important: Be certain no one else is working in the page set before deleting it. If anyone has any pages checked out in the Plan, you cannot delete a page set. If anyone is working in the page set in InDesign, you can delete the page set but editorial may be affected.
In the Plan, select a page in the page set you want to delete.
Do one of the following:
In the Plan menu, choose Pages -> Page Set -> Delete.
Press Ctrl+Shift-D (Windows) or Command+Shift-D (Mac OS). The Delete Page Set dialog appears, asking you to confirm that you want to delete the page set.
Click OK.
Naviga Plan deletes the page set.
Was this helpful?