Search & replace
This tutorial will give you an introduction to transactions, text selections and text manipulation in the text area using the Substance API.
In order to learn about these concepts this tutorial will help you create a simple search and replace plugin in the Writer. This means you should have the NPWriterDevKit in order as described in the quickstart guide.
This particular tutorial will use a popover in the top bar as the user interface. However, the focus will be to explain transactions, text selections and text manipulation.
Concepts to understand
Document nodes
The article content, as opposed to metadata, is number of nodes in a document. These nodes can be text or other kinds of objects. In order to select or manipulate text you will need to fetch document nodes and work with these nodes in transactions.
This tutorial won't go into the details of annotations, i.e things like strong, italic, code or inline objects like links which sits "on top" of the text. Mostly you really don't have to worry about annotations when manipulating text.
In all components of the Writer you have access to a context object which has a reference to an editorService object. This is the starting point for text manipulation.
This is how you use the editorSession to fetch the document and its nodes in any component:
const doc = this.context.editorSession.getDocument()

// Get all nodes (paragraphs, images, etc)
const nodes = doc.getNodes()
Loop over the nodes to find nodes with content, i.e text content:
for (let id in nodes) {
    if (nodes[id].content) {
        // Echo the text id and content to the console
        console.log(`${id}: ${nodes[id].content}`)
    }
}Selecting text
Selecting text requires access to the document (obviously), the specific node id as well as the start and end offsets. So let's assume you already have the document in doc and you have singled out a specific node id in id.
The above code will create a selection with a start offset 5, span 7 characters and end at offset 12. When the selection has been created you need to apply it to the document using setSelection().
Transactions and manipulations
A transaction in the Writer (or rather Substance) chains a number of different changes together into one unit. Each transaction can then be undone or redone in it's entirety by the user using CMD+Z/CMD+SHIFT+R or CTRL+Z/CTRL+SHIFT+Z.
Transactions can be created using a call to editorSession.transaction(). As a parameter you provide a closure function which is called with a transaction object as parameter.
The transaction object you get as a parameter contain all the functions you need to manipulate text. Again you need to know the node id of the text node you want to perform operations on.
The below example will replace rabbit with deer in a text node with the content A rabbit with blue horns.
Putting it all together
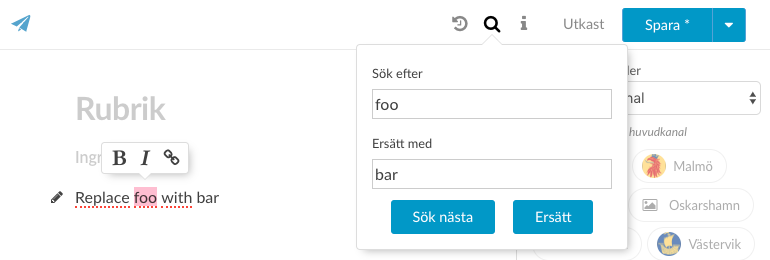
Let's see how you put these pieces together to create a simple search & replace plugin. The end result we're aiming for is:
The package file
Start with the package file. As a bare minimum you will need a component to be rendered in the popover.
In the Writer you have easy access to the Font Awesome icons. For example when creating a popover. In the below code you state that you want a popover to be accessible on the right of the top bar using the Font Awesome icon fa-search. You also want the popover to be sticky, i.e not close automatically when the user clicks elsewhere.
You should always use labels so that others can translate them if you don't.
The user interface component
Next up you need to create the user interface component and some css to go with it. You will need to extend the Substance Component, import a Writer UIButton and the css file.
Note how you call .ref() when creating some of the ui components. This adds them to a object property that you can access through this.refs anywhere in your component.
Make it look a bit easier on the eye using some basic css.
Handling state
Every component has a state. It's essentially an object with the components current, private, state properties. You manipulate the state using functions. A state change may or may not trigger a rerender of the component.
Before anything happens a component will have it's getInitialState() called from within Substance if it is implemented. This method will return the, well, initial state.
For this component to work you will want to keep track of current matches, the offset (or which match is currently handled) and the last search (from/to values).
Every now and then you will need to clear the state completely. Create a helper function for that.
Searching and selecting matches
As you saw above in the search button on click handler we call a findNext() function. The purpose is of course to find and select the next matching string in the text. We will split that into three different functions.
The find next function should perform a fresh search and then select the appropriate match.
The search function is the largest function. Basically the purpose of the function is to loop over all text nodes in the document, find all strings that match the search, and save these into the matches property in the component state.
Below is the fully commented search function.
Finally you need to select strings matching the search. If the state.offset is null you know that there are no current matches.
That is really it. You should now have a fully functioning search. When the Find next button is clicked repeatedly the code should circle through all matches and select the corresponding string.
Whenever a the search string is changed in the input field the code should start over and select the first match.
Replacing
The only thing left now is to replace the matches with the user entered text. In the components render function a Replace button was created with a click handler that called this.replace(). You will recognize most of this code from above when reading about transactions and text manipulations.
Make it simple. If there is no matches, call findNext() to performa a fresh search. If no matches till couldn't be found nothing needs to be replaced. Using state property offset you will know which of the matches should be replaced.
After the text has been replaced use the Array.splice() method to remove the match from state.matches. Then set the current match, state.offset, to the next one (unless you're out of matches in which case you set it to null again).
Lastly call findNext() to performa a fresh search and select the next match.
Summary
If you haven't forgot to import the correct package file name in the index.js you should now have a fully functioning search and replace plugin. It could be improved in a number of ways - case insensitive search, whole word search, etc - but as a whole it works pretty well.
And hopefully the tutorial should have given you a better understanding of how to select and manipulate text using transactions in the Writer.
To sum it up, all the files and the full directory structure should look like below.