
General Tab
The general tab has several tabs across the top of the screen. For most sites, your Naviga Plan Implementation Specialist will set these up for you prior to or during your setup training. They are not generally something you will need to change, so please check with Naviga Support before changing these settings.
Source
The source tab will be configured to connect to the source system for receiving ads from the ad system. Current options under the dropdown below include Naviga Ad, Adbase, AMP (Ad Manager Pro), and AdDesk.
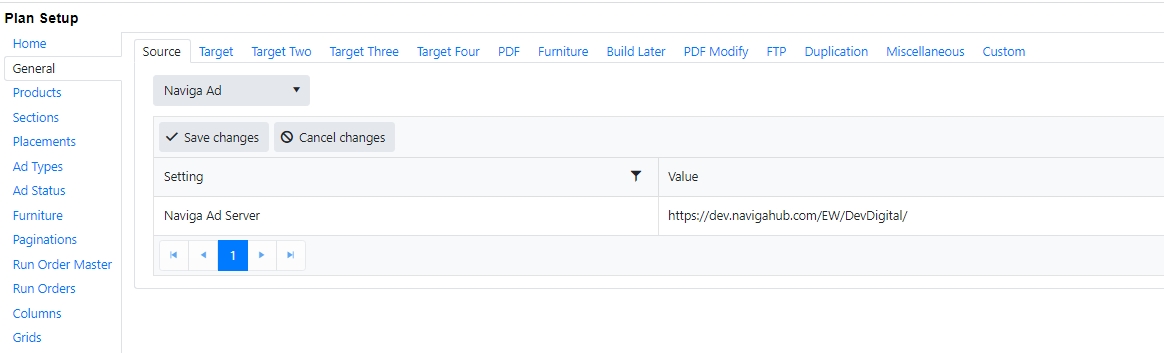
In a Naviga Ad implementation, the setting will be set as the URL for the Naviga Ad system. Plan Integration will connect to this sending system to receive orders booked and configured to be sent to Naviga Plan.
AdDesk will also be expecting a URL to AdDesk.
In AdManagerPro, DTI, and Adbase, this setting will be for the Bookings Folder and the value will be a network drive location for the bookings sent from the source system. Plan integration will be monitoring this location to bring those orders into plan.
Target/Target Two/Target Three/Target Four
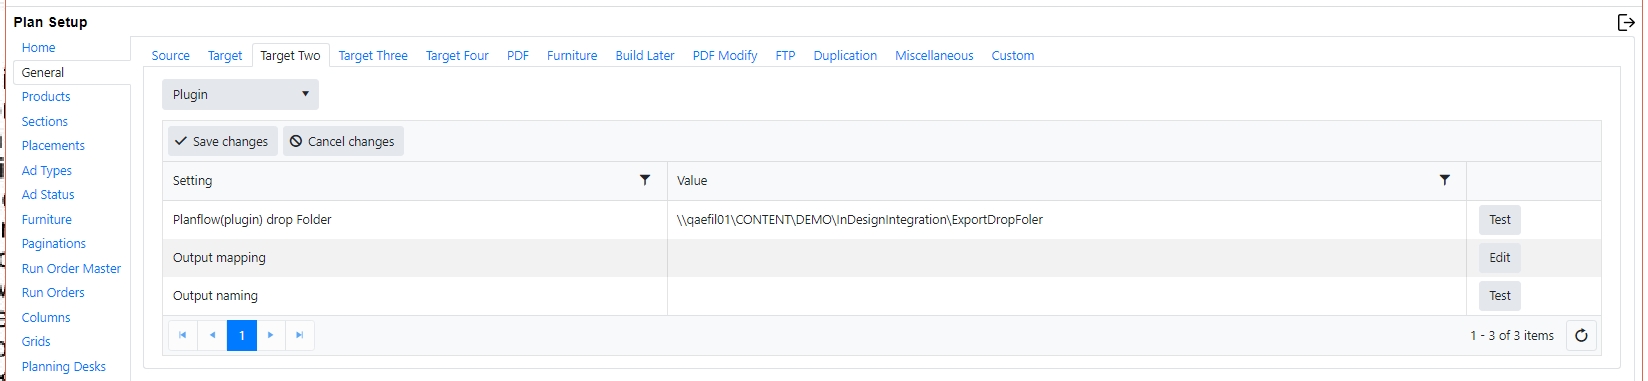
Target/Target Two/Target Three/Target Four all have similar options. What is configured in here will be the Editorial system output choices inside Naviga Plan (Found in Naviga Plan under File > Output). Most sites will not need to utilize all four targets, but this allows you to have up to four different output channels/target systems.
The settings needed vary by target system and Naviga implementation will work with you to ensure that we are outputting to the correct location and with the correct settings for your content system to properly receive the info. Generally, we are sending a PDL or XML file and the pdfs of the ads. Any fields that are required to be set up will be highlighted. If there is no highlight, it is either already filled in, or it is not required.
At the end of each line is a test button. This allows you to test to ensure that the folder exists and is accessible to the Plan Integration server.
We offer the following targets:
NCS Content (Only offered as Target, Not Target Two, Three or Four)
Newsway
Presteligence (Also used by Tecnavia)
InDesign (called Plugin in the Target list)
Eidos
ProImage
TownNews
Content Publisher
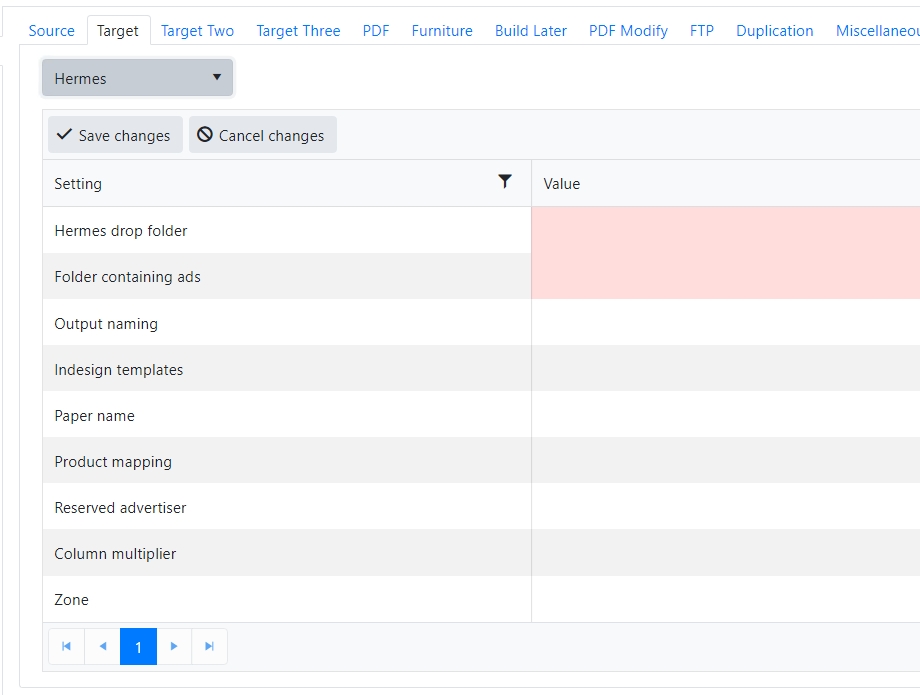
Hermes
CUE / CUE2
Miles33
Kndr Tearsheet / AM
Merlin (Only offered under Target Three)
NCS Content:
If using NCS Content, there are two options in the Target list: NCS Content and NCS Content File. NCS Content is for tightly integrated environments where Naviga Plan is running inside the NCS Database and the stories are passed back into Naviga Plan for the Planners to be able to see the stories (Read-only) and where they are placed on the page.

PDL Drop Folder, Duplicate Drop Folder, and Folder Containing ads – these settings are optional here, unlike in the other Target systems. These are generally configured in the NCS Content Page Producer settings. If you enter in something different here, it will override the Page Producer settings.
Output Mapping – This allows you to override certain fields in the output and replace them with different fields. (See Output Mapping in Town News section below. It works similarly here.)
Column folders for furniture – In many implementations, the furniture is organized in subfolders based on how many columns are in the material. So, folders might be called 01, 02, 03, etc up to the number of columns on the page. NCS Content systems often just use one big ad folder for ads and furniture. Indicate “on” or “off” here based on the way your folders are organized.
Output product override – This option enables the ‘Override’ field in the output dialog that inserts a different product code into the output xml file.

![]()
PDL Output naming – enter a filename here to match a filename pattern already created. This will override the name of the PDL file that gets passed over to NCS Content and Ad Integration. The default if you leave this blank is PRODUCT then Issue Date then page numbers then timestamp. Here is an example: NAV10 is the Product Code. The issue is Dec 24, 2021. The file contains pages 1-28 and 14:31:38 is the time of the output.
Create file shortcuts in Target 2/Target 3/Target 4 – This is an optional on/off flag. In earlier versions, the primary Target had NCS Content or InDesign (in addition to other output options). Target 2 and 3 had all the other output options, but did NOT contain InDesign or NCS Content ad options. So if a site wanted to use BOTH InDesign and NCS Content, they had to use the “duplication” function to basically copy the ads and put them into both folder structures, which used up more space on the server. With the file shortcut options now, you can make NCS Content the primary target, and InDesign is now an option in Target 2. When set to “on” Integration will put the actual ad pdf in the NCS Content folder and will also create a link to it in the InDesign drop folder path. If you choose to use this function, please ensure that the version of InDesign PlanFlow you use is later than Sept 2021 as that is when this feature was introduced.
Use 100 folders in ad source folder - some configurations have all the ad (material) PDFs in a single folder. Others subdivide the ads by the last two numbers of the line id or ad name. This is not an issue except when generating PDFs, Plan needs the correct location of the source ad. If this field is set to true, Plan will append the correct 2 digit number onto the ad folder to find the ad.
Default Product – This setting is only used for AdDesk integrations. Plan Integration needs to know where any ads should be placed in the filing system. It does this by reading the Page Producer settings from Print Production. When using AdDesk, this is the product that matches the Page Producer that will be used.
Use Names from Print Production – by default Plan controls the names of each page sent over to Print Production. However, with some workflows the preference is to have Plan use the names that are generated by Print production.
Historic MPD break Fix – Some older Print Production systems have a problem with handling MPD’s that are made first in the workbench. When Plan loads these from Print Production and they get sent back again they can split apart. This is a fix for this but should not be used on systems that don’t exhibit the problem.
Disable page deletion on export - Normally when a page is deleted in Plan, the PDL file sent to Print Production also contains the page delete instructions. However, some workflows do not require this.
Page numbers in ascending order - we create a PDL file to send pages to Print Production. These are normally in descending order to support MPD’s. However, some third party systems that use this file can only cope with ascending pages numbers, which this option allows.
Include reserved (ed,ad,sell,special,material) - By default, reserved space for ads, to sell, special, and material are all sent. editorial space is not sent, but can be by modifying the values here to include it.
NCS Content File:
NCS Content File is the option to select if the systems are disconnected. If NCS Content File is selected, then we are simply passing ads and geometry information (in a PDL file) over to NCS Content, like our integration with the other editorial systems.

PDL Drop Folder / optional duplicate PDL Drop folder - location on the Plan Robot machine where Plan should output the PDL to.
Folder Containing ads – Folder on the Plan Robot machine where Plan integration should place the ad pdf’s upon import.
Output Mapping – This allows you to override certain fields in the output and replace them with different fields. (See Output Mapping in Town News section below. It works similarly here.)
InDesign Templates – File location containing Templates for InDesign.
Column folders for furniture – In many implementations, the furniture is organized in subfolders based on how many columns are in the material. So, folders might be called 01, 02, 03, etc up to the number of columns on the page. NCS Content systems often just use one big ad folder for ads and furniture. Indicate “on” or “off” here based on the way your folders are organized.
Output product override – This option enables the ‘Override’ field in the output dialog that inserts a different product code into the output xml file.
PDL Output naming – enter a filename here to match a filename pattern already created. This will override the name of the PDL file that gets passed over to NCS Content and Ad Integration. The default if you leave this blank is PRODUCT then Issue Date then page numbers then timestamp. Here is an example: NAV10 is the Product Code. The issue is Dec 24, 2021. The file contains pages 1-28 and 14:31:38 is the time of the output.![]()
Page numbers in ascending order - we create a PDL file to send pages to Print Production. These are normally in descending order to support MPD’s. However, some third party systems that use this file can only cope with ascending pages numbers, which this option allows.
Include reserved (ed,ad,sell,special,material) - By default, reserved space for ads, to sell, special, and material are all sent. editorial space is not sent, but can be by modifying the values here to include it.
InDesign Script (Plugin)

Planflow(plugin) drop folder - This will be entered in for you by your Naviga Plan Implementation Specialist and shouldn’t be changed unless instructed to do so. This location will have subfolder for Ads, Furniture, and Templates.
The ads folder will contain folders for each product/Issue Date/ads
The furniture folder will have subfolders for banners, headers, and fillers with subfolders for products, etc.
The templates folder will have subfolders for Products and will contain the indd template to be used for that product. If you use the same template for multiple products, you will need to copy the indd file into each product folder so that Plan can see it.
Output Mapping – This allows you to override certain fields in the output and replace them with different fields. (See Output Mapping in Town News section below. It works similarly here.)
![]()
Output naming – enter a filename here to match a filename pattern already created. This will override the name of the Indesgin output xml file. The default if you leave this blank is PRODUCT then Issue Date then page numbers. Here is an example: NAV13 is the Product Code. The issue is Oct 7, 2022. The file contains pages 1-36.
Global InDesign template Folder - shared file location for Indesign Templates
Include reserved (ed,ad,sell,special,material) - By default, reserved space for ads, to sell, special, and material are all sent. editorial space is not sent, but can be by modifying the values here to include it.
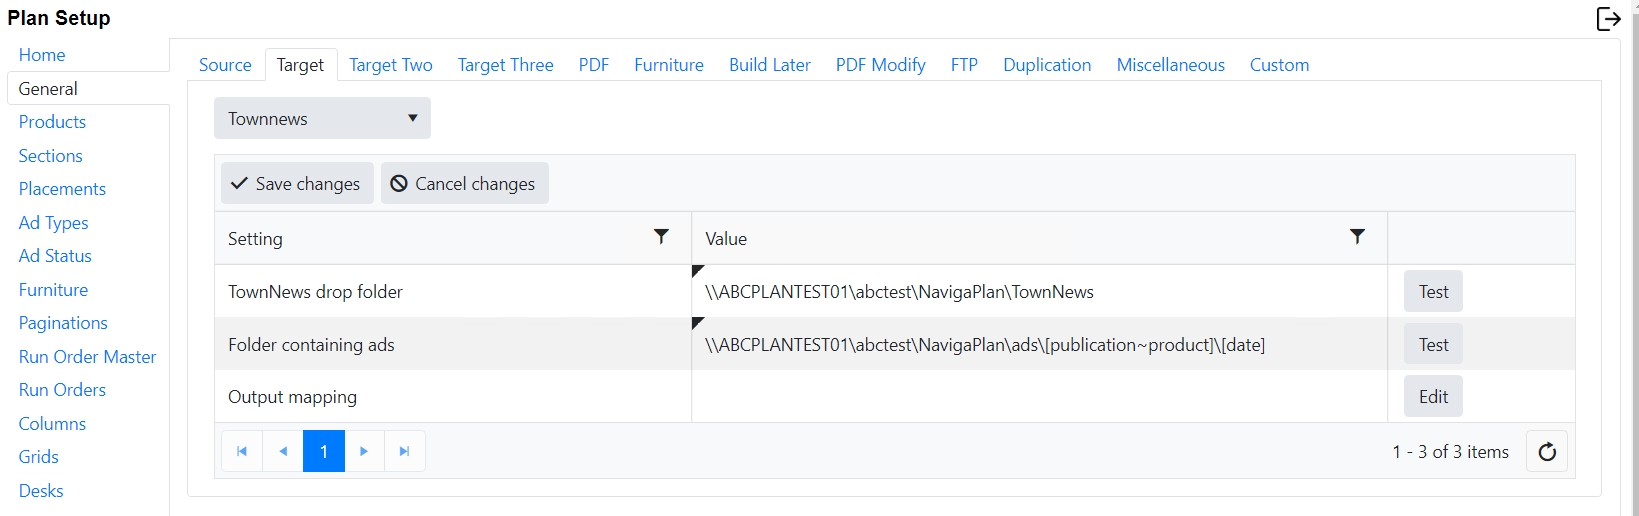
TownNews:
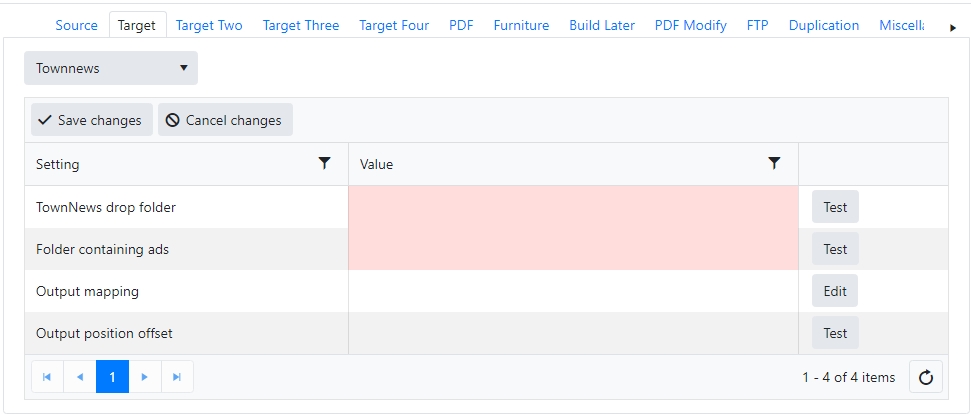
TownNews drop folder: This is where Naviga Plan will output the xml file which will feed over to Town News to tell it which ads to place on which pages, and the specific geometry of where on the page that ad should be placed.
Folder Containing Ads: This is where Plan Integration will place the ad pdf when it is imported in from the ad system. This field supports a variety of optional fields for formatting the folder structure that stores the ads. The following fields will be replaced with the proper value according to the where the ad belongs:
[date] – Publishing date of the product
[DD] – Townnews generally will have all ads in a single ad folder or will break them into folders by day of month. By adding this parameter, you will get subfolders of 01, 02, 03….31 – one for every day of the month.
[product] – Product Code from Product Setup
[planname] – name of the plan (generally a combination of the Product Code and the date)
[publication] – The Publication from the Product Setup
[version] – Plan Version
[channel] – Channel from Product Setup
[info1] – Info One from Product Setup
[info2] – Info Two from Product Setup
[type] – This is the type of plan and the most common are 0 and 2. The others are site specific for one Naviga customer. The possible outcomes though are:
0 = normal plan
3 = unused
1 = variation plan
4 = slip plan
2 = version plan
5 = zone plan
[publication~product] - This will use publication unless it’s empty, then use product
This is what the setup might look like where both the product and the date are being dynamically created:
Output Mapping:
Click the “edit” button in the Output mapping to see the below screen. The items shown in red in the xml sample in this section are from the Name column of the screenshot below:
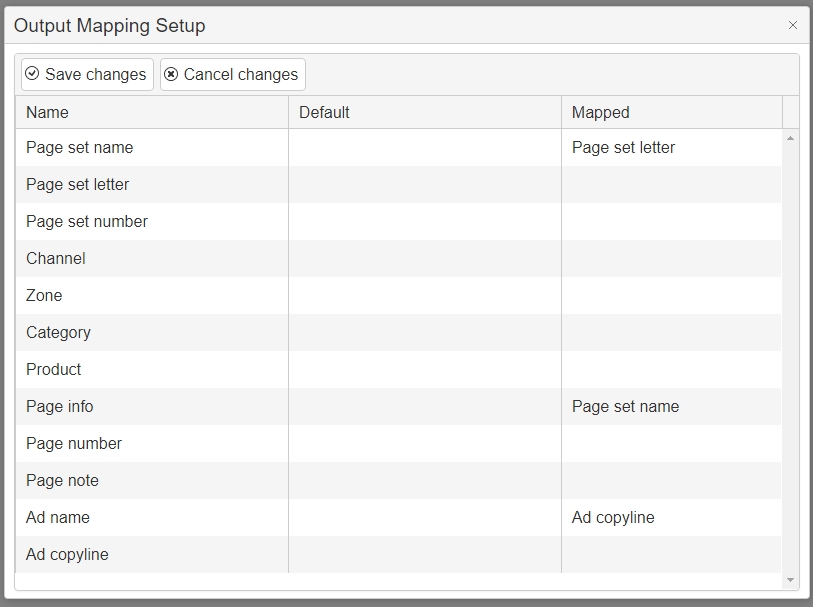
To use a different value instead of the above name value, select a field from the relevant drop-down list from the mapped column:
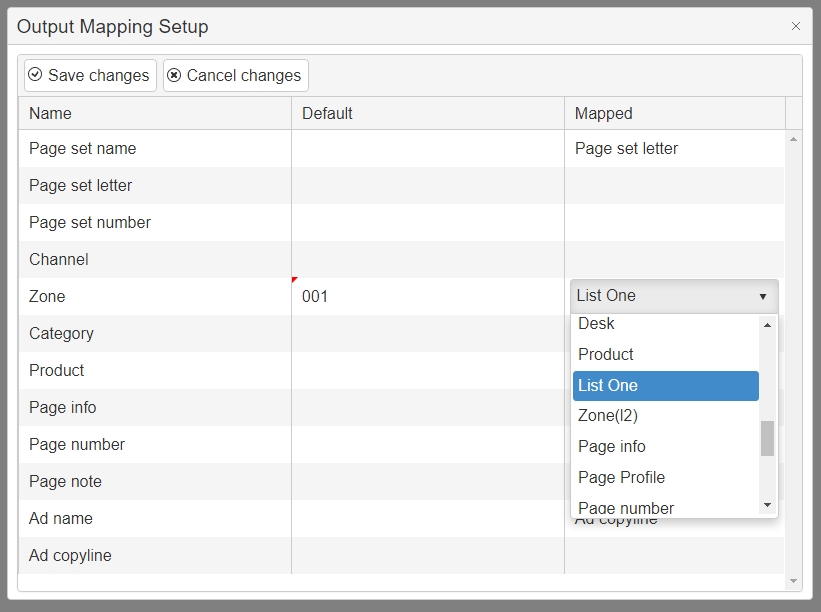
The value in the default column is used if the mapped field is empty.
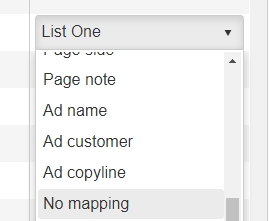
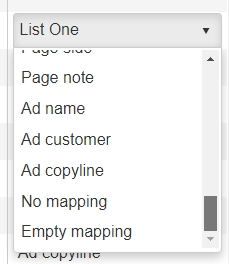
To clear a selection, use No Mapping:
To force a filed to be always empty use “empty mapping”
Note: Remember to Save in both this dialog and the general dialog!
Town News
<?xml version="1.0" encoding="UTF-8" standalone="no"?>
<saxopdl>
<head>
<xmlversion value="1"/>
<pageplanningsystem>
<name value="Naviga Plan (TOWN_NEWS)"/>
<version value="1.4"/>
</pageplanningsystem>
<issue>
<date value="20210309"/>
<name value="Product"/>
</issue>
</head>
<pagedescriptions>
<pagedescription>
<foreignparentid/>
<foreigncommonpageid/>
<note>Page note</note>
<deleted value="FALSE"/>
<name value="Page info"/>
<pagenumber value="Page number"/>
<sectionpagenumber value="Page set number"/>
<section value="Page set name"/>
<sectionletter value="Page set letter"/>
<channel value="Channel"/>
<zone value="Zone"/>
<edition value="Publication"/>
<passive value="FALSE"/>
<templatefile/>
<usedColor c1="C" c2="M" c3="Y" c4="K"/>
<fixedcolor c1="0"/>
<possiblecolor c1="C" c2="M" c3="Y" c4="K"/>
<ads>
<ad>
<pos x1="183.0" x2="306.12" y1="264.248" y2="282.248"/>
<foreignid value="351.111"/>
<file name="D:\PlanSmartPaths\eidos\ads\3025.pdf"/>
<description>Ad name</description>
<status value="co"/>
<fixed value="FALSE"/>
<visibleinfo> Ad copyline </visibleinfo>
</ad>
</ads>
<fillers/>
<headers/>
<banners/>
<lines/>
</pagedescription>
</pagedescriptions>
</saxopdl>
Output Position offset: These values are used to adjust the position of each element sent to Town News. It adjusts for margins as some systems assume margins should be included (ie. an ad in the top left corner of a page would be 12,12) and others it should be exluded (ie. the same ad would be 0,0). Typical formats would be: -10,-10 or 12,6
The values are in points.
Hermes:
Newsway:
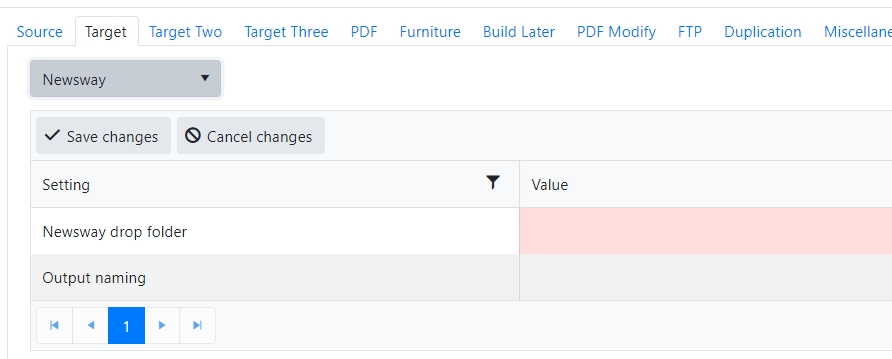
Newsway drop folder: This is where Naviga Plan will output the xml file which will feed over to Newsway to tell it which ads to place on which pages, and the specific geometry of where on the page that ad should be placed.
Output naming – enter a filename here to match a filename pattern already created. This will override the name of the output xml file.
Eidos:
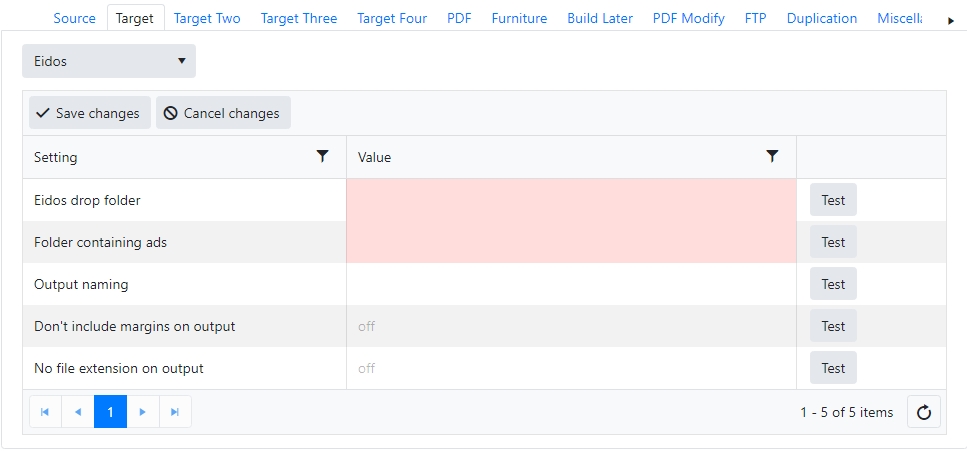
Eidos drop folder: This is where Naviga Plan will output the xml file which will feed over to Eidos to tell it which ads to place on which pages, and the specific geometry of where on the page that ad should be placed.
Output naming – enter a filename here to match a filename pattern already created. This will override the name of the output xml file.
Don’t include margins on output: If set to true, it will ignore any margins set in Plan when it creates the output
No file extension on output – if set to off there will be a file extension. If set to on, there won’t be a file extension on output.
Presteligence (same output file also used by Tecnavia):

Presteligence drop folder – should be the location on the Robot machine where the XML output should be placed when the Plan user outputs to Presteligence.
Folder containing ads – if we are sending the actual materials, put the location of the ad pdf’s here. If this is just a reference file, then you can just put c:\ here.
Tecnavia needs to understand the ad type to distinguish between the classifieds and the display ads. By default, the AdType tags are showing a zero in the Presteligence output, which means they all get treated like display ads … <AdType>0</AdType>
Previously, Naviga ad only passed over that it is a “liner” type of ad or not. Modification was made to pass over the ad type ID as an additional field in the integration.
Plan can now use that Ad Type ID to determine what type of ad it is. Tecnavia wants a 1 for Retail and a 2 for Classified, so plan needed a look up table to translate that. (Version 130407 or later of Plan is required (circa July 9, 2021)).
In Plan Setup, the “Custom 1” field has been used for this purpose. The label should be changed here:
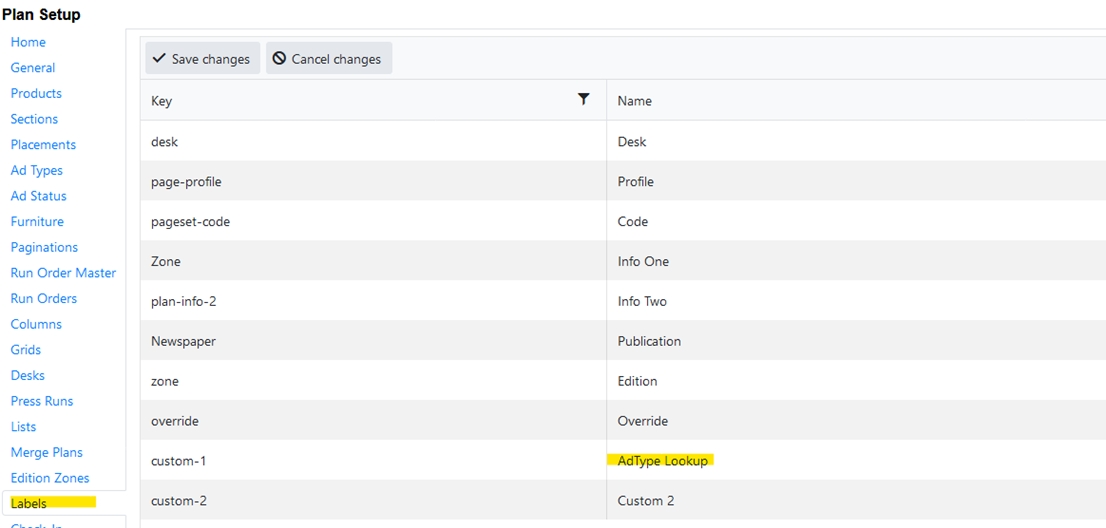
And all the ad types need to be defined on the Lists along with the appropriate code for that ad type:
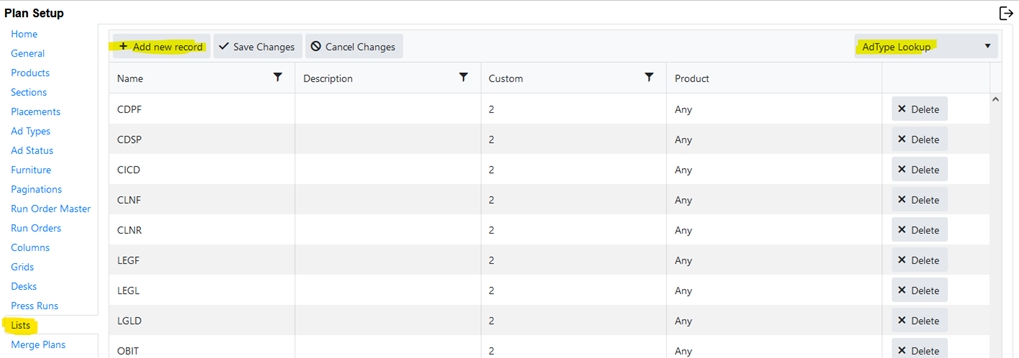
Select “AdType Lookup” from the top right (formerly Custom 1 before the label was changed)
Select “add new record” and type in the Ad Type ID from Naviga Ad, and the appropriate Tecnavia code in the “custom” field. Select which product is applicable (or select “any” if applicable to all products.)
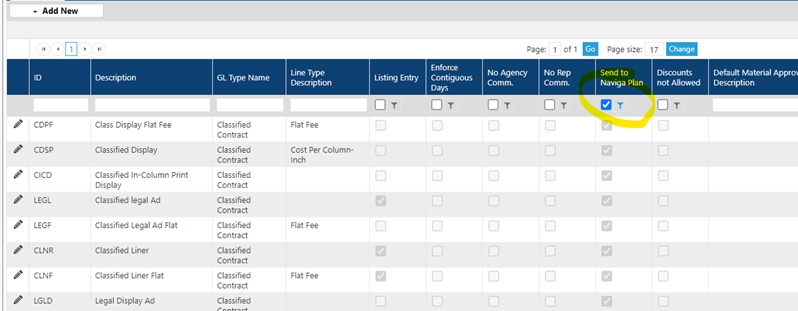
Repeat for all ad types that are coming into Plan. Can filter on Ad Type Setup in Naviga Ad to get the list:
Include reserved (ed,ad,sell,special,material) - By default, reserved space for ads, to sell, special, and material are all sent. editorial space is not sent, but can be by modifying the values here to include it.
Content Publisher

Content publisher drop folder - should be the location on the Robot machine where the XML output should be placed when the Plan user outputs to CP.
Output naming - enter a filename here to match a filename pattern already created. This will override the name of the output xml file.
Export on save - if set to "on" then the output will automatically run when the plan is saved. If set to off (default) the user will need to select File -> Output -> Content Publisher to output the above files.
ProImage

ProImage drop folder - should be the location on the Robot machine where the XML output should be placed when the Plan user outputs to ProImage.
Output naming - enter a filename here to match a filename pattern already created. This will override the name of the output xml file.
Export on save - if set to "on" then the output will automatically run when the plan is saved. If set to off (default) the user will need to select File -> Output -> ProImage to output the above files.
Export on Save Day Limit - default is 30 days. Can select alternate dates if desired.
Duplicate output path - file location to duplicate export
Merlin
Note - there is also an Interface Link component to this. Plan takes care of the page information, but IL needs to also retreive the tearsheet contact information from Naviga Ad.

Merlin drop folder - should be the location on the Robot machine where the XML output should be placed when the Plan user outputs to ProImage.
Page naming - enter a filename here to match a filename pattern already created. This will override the name of the output xml file. The Page Names included in the below Ad File Output, will use this Page Naming Pattern for (<pdf_name>, <next_page>, <prev_page>). The file names of the <page reader_view> tag in the Page File Output Naming will also use this Page naming format.
Ad File Output naming - This will output an XML file to the above drop folder which looks like this:

Page File Output Naming - This will define the naming pattern of an XML output file which looks like this:

Advertiser is Brand: default is off and the Naviga Advertiser name will be used in the <advertiser> tag on the Ad File Output. If set to "on" then the Naviga Brand Name will be used as the Advertiser name instead.
Enable Autosave - if set to "on" then the output will automatically run when the plan is saved. If set to off (default) the user will need to select File -> Output -> Merlin to output the above files.
Kndr AM & Tearsheet
This is an export for the DTI Ad Manage product and for the associated Tearsheets. These two options match exactly what DTI Ad Manage used to export. Both have similar Options in the settings.

Drop folder - The location on the Robot machine where the XML output should be placed when the Plan user outputs to Kdnr AM (or Kdnr Tearsheet).
Output naming - enter a filename here to match a filename pattern already created. This will set the name of the output xml file.
Export on save - if set to "on" then the output will automatically run when the plan is saved. If set to off (default) the user will need to select File -> Output -> Kdnr AM (or Kdnr Tearsheet) to output the above files.
PDF

If it is desired to output a pdf of the page rather than individual ads and geometries, then the PDF tab may be filled in.
For PDF file creation setting indicate on or off. If set to “on” then pdf will be found as an output option in Naviga Plan menu under File > Output.
When outputting as a pdf in this manner (with File > Output > PDF), it will output a pdf of the entire page. Even if the ads are only taking up half the page, the pdf will be a full-page pdf. To output as a pdf of the partial page, utilize the “block” reserve type (See Naviga Plan User Guide_2021-3.pdf for information on how to use a block reservation).
It is required to fill in the “PDF Drop Folder” location as well as the “Folder containing ads” location, which is the folder where the ads can be found. The Drop folder location is the location on the Plan Robot server where the pdf will be output.
Like some of our other output, the PDF Drop Folder location can contain substitution tags for subfolders. The following substitution tags are available.
[date] – Publishing date of the product
[product] – Product Code from Product Setup
[planname] – name of the plan (generally a combination of the Product Code and the date)
[publication] – The Publication from the Product Setup
[version] – Plan Version
[channel] – Channel from Product Setup
[info1] – Info One from Product Setup
[info2] – Info Two from Product Setup
[type] – This is the type of plan and the most common are 0 and 2. The others are site specific for one Naviga customer. The possible outcomes though are:
0 = normal plan
3 = unused
1 = variation plan
4 = slip plan
2 = version plan
5 = zone plan
[publication~product] - This will use publication unless it’s empty, then use product
Set the following settings to on or off, depending on the source information and the desired destination behavior.
Use product in destination folder
Use date in destination folder
Use product in furniture source
Use column in furniture source
Ignore page margins – Set to “on” if you want the pdf to be output with no margins. Set to “off” (or leave blank) and page margins will be included in the pdf output,
PDF file naming setup - By default, the name of any PDF file is simply its absolute page number. To give them more meaningful names setup a new naming configuration in the filenames tab and then reference it here. (See Filenames setup in this document). This is a fill in the blank type of field, so best to copy and paste the defined filename into here to ensure it matches. Click test on the right to validate that it is indeed a valid filename pattern.
PDF Block output folder - if using the PDF block setup described below, the file will be output to a default location. The location set here will override the default. Can use substitution tags defined above in this output folder as well.
PDF block naming setup - When outputting a page to an editorial system, any ad or ads placed within a reserved ‘block space’ are automatically combined into a single PDF. These new PDFs are given a default name. If required, this name can be changed by using a naming configuration in the filenames tab. (See Filenames setup in this document). This is a fill in the blank type of field, so best to copy and paste the defined filename into here to ensure it matches. Click test on the right to validate that it is indeed a valid filename pattern.
Furniture
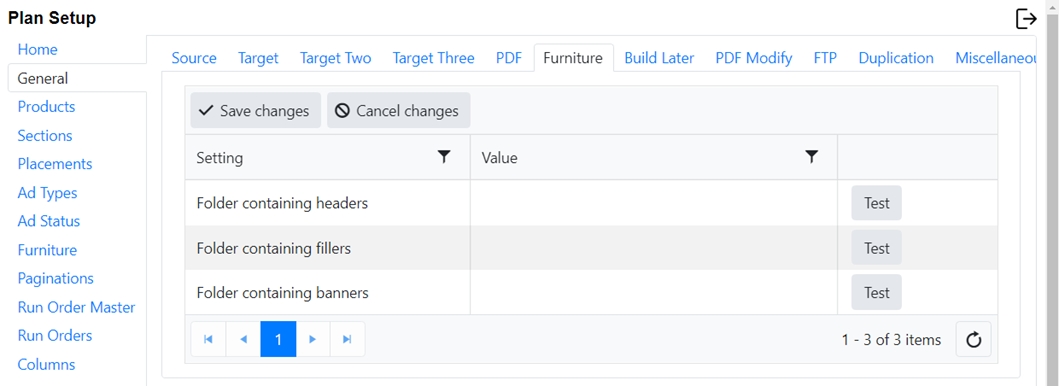
On the furniture tab, indicate the path in the system where the headers, fillers and banners are stored. This is the destination folder, not the folder on the ftp where you do the import from. See Importing Headers, Banners & Fillers
If you are in an InDesign driven environment, your settings will look something like this, with your site code used in place of ABC below:
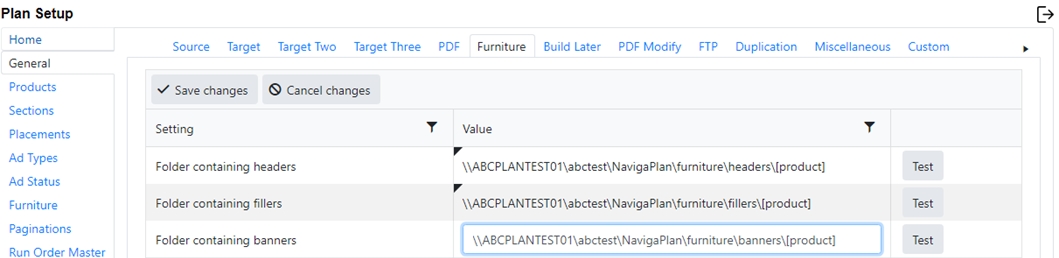
Note: Test environment with either start with TST- and Production environment will start with PRD- or there will be test or prod in the name, so that you can easily differentiate.
In an environment connected to NCS Content, your NCS Content setup may override the above settings.
In the folder structure, you can place parameters to fill in certain folders within the above headers, fillers, and banners folders. These are the options:
[columns] – Number of columns wide the header, filler or banner is
[date] – Publishing date of the product
[product] – Product Code from Product Setup
[planname] – name of the plan (generally a combination of the Product Code and the date)
[publication] – The Publication from the Product Setup
[version] – Plan Version
[channel] – Channel from Product Setup
[info1] – Info One from Product Setup
[info2] – Info Two from Product Setup
[publication~product] - This will use publication unless it’s empty, then use product
Build Later
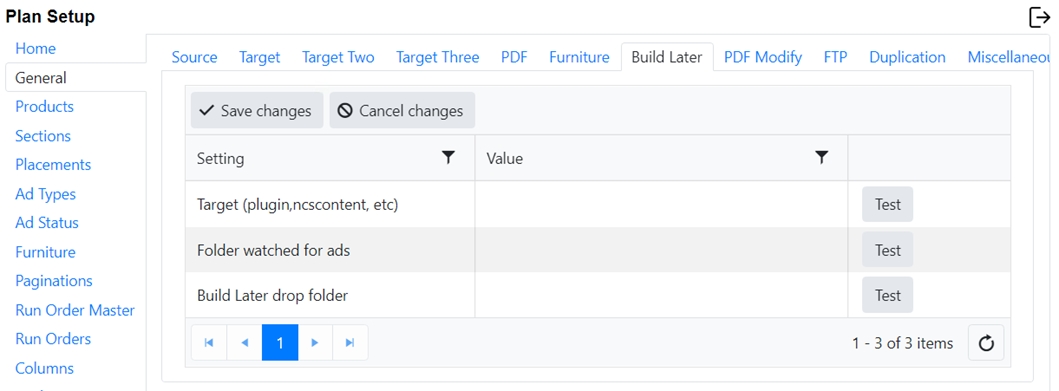
This option allows updated ad PDFs to be processed by Integration without being pushed from the booking system. When enabled, any PDF ad dropped onto the watched folder will be picked up and moved to the correct location in the output folder structure. This process runs once every 3 minutes. Any existing ad will be overwritten. As part of this process Integration will update the preview, measure the size of the ad and if needed, calculate any line breaks for long ads. The name of the ad (either a line id or material id) is used for identification.
Note that the ad must have been previously booked for this to work.
Target - As Integration can have multiple targets that have different folder layouts this option specifies what will be used. Normally the same as ‘Target One’. empty = off options: ncscontent, plugin
Folder watched for ads - Folder where Integration watches for ads being dropped.
Folder ads are moved to - This is where the ads are being placed after processing through integration. Usually this should be set to the same as ‘Target One’
PDF Modify
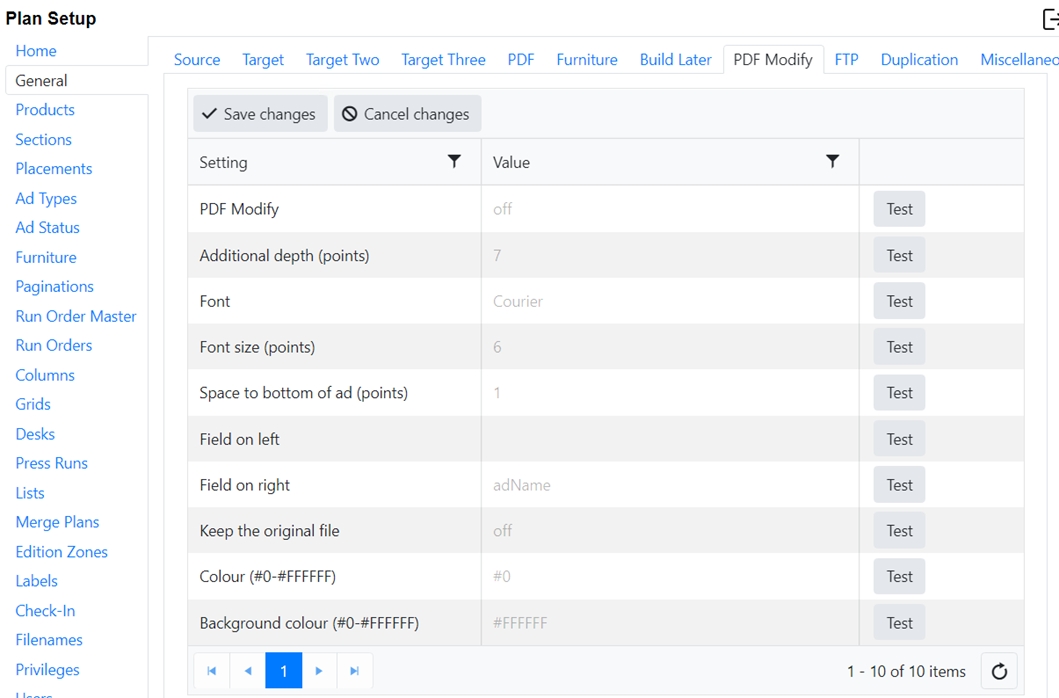
The pdf modify will edit the ad PDFs to add certain information that some sites wish to have as part of the ad. For example, the ad number may be desired to be printed in the ad itself as a reference to the ad. This is not something that Naviga Ad offers, so Plan can modify the ad PDF to insert that information.
PDF Modify – Options here are off or on.
Additional Depth (points) – The PDF will grow by this many points to accommodate the space needed to add the information.
Font and Font Size (in points) – Name of the font to use to create the additional text. This Font needs to be installed on the Plan Robot machine.
Space to bottom of the ad (in points) – This will be the space between the bottom of the original ad and the top of the added text. The “Additional Depth” above must be sufficient to include the space at the bottom of the ad plus the font size.
Field on left or Field on right: Options are filename or adname. The Filename is the name of the actual pdf file. AdName is the name of the ad (line id if using Naviga Ad). It can be justified to the left side of the ad or the right side.
Keep the original file - default is off. can be set to on if desired. If the original is saved, it will be saves with "orig-" prepended to the filename. So if the ad is 3111.pdf, then the original will be orig-3111.pdf. If changing this setting, please re-start integration for it to take effect.
Color and Background Color – Text color and background color for the additional text.
FTP
Naviga Plan and Naviga Plan Integration now support FTP & SFTP for transferring files to remote systems. Included are:
From Plan:
Geometry files created from the File > Output menu.
Geometry files contain the pages in a plan and x & y locations of ads. Formats include: NCS Content, NCS Content File, PlanFlow (this is the InDesign plugin option), TownNews & Presteligence.
PDF files created from Output > PDF
From Integration:
PDF ad files transferred from Naviga Ad
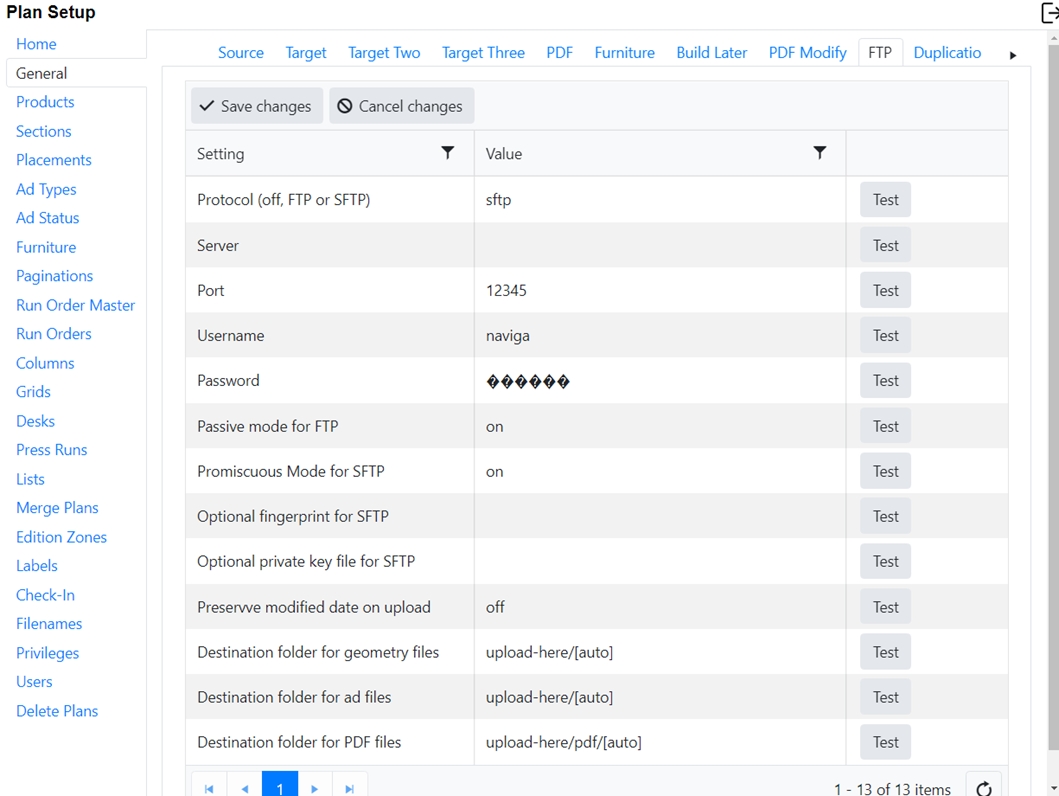
With the FTP option turned on, Plan Integration will drop the ads into an ftp location rather than storing them on the AWS cloud server. Naviga Plan will go the same with the geometries on output. This is the preferred option for some sites who do editorial locally and only have the Naviga Plan users working in the cloud.
Plan Integration will still import a preview image into the database for previewing pages inside plan and will send the final ad material to the FTP.
From Naviga Plan, when the geometries are output, instead of dropping into a local directory, it will be sent to the configured FTP.
Features
SFTP support includes:
authorization by name & password or by name & key file
optional server fingerprint check
optional checking local ‘known_hosts’ file
FTP support includes:
optional passive mode
Integration
Uses store & forward so if the connection is unavailable, all ads will be stored & resent automatically when the connection becomes available.
Options for either a single destination ads folder or using the default structure for that format (i.e. PlanFlow, NCS Content etc.)
Remote server check on startup
Using from Plan
From the Output Menu

Brings up the standard dialog:

Click ‘OK’ to send the geometry file and you get:
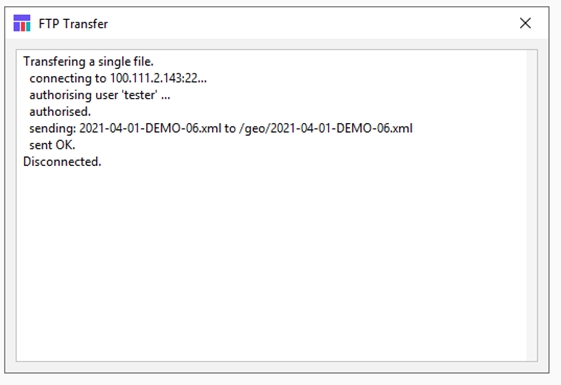
Click the [x] to close the window. Multiple pages can be sent together.
Using from Integration
Nothing much to see here, but on startup, Integration will check that the remote (s)ftp server is available.
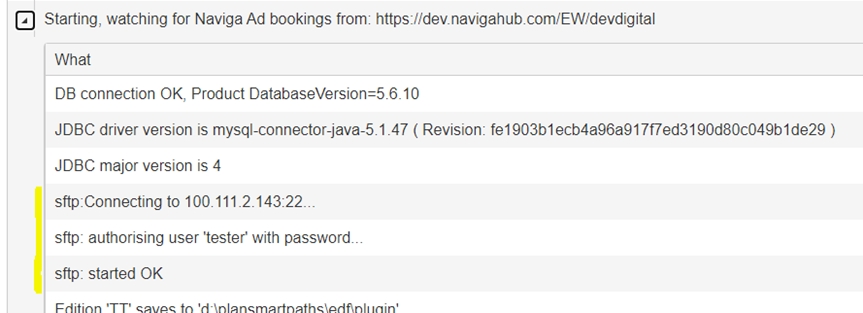
If there is a queue of files waiting to be processed, they will be included at this point.
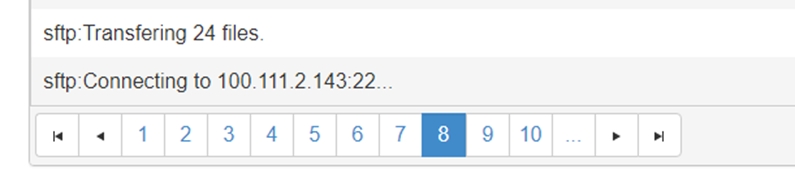
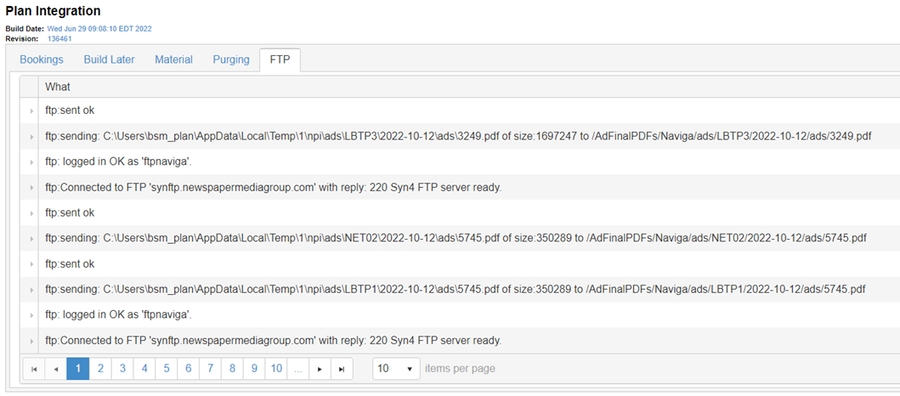
Transfer information is available under the ‘FTP’ tab:
Duplication
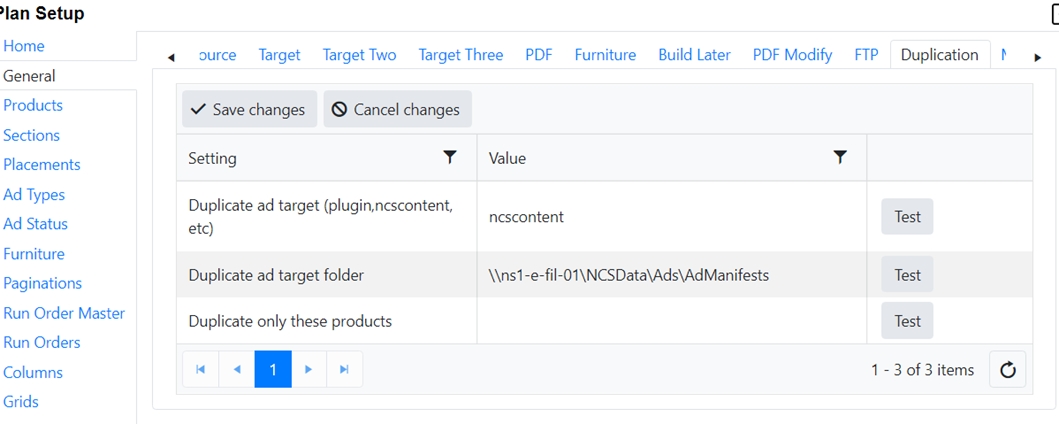
Duplication is an uncommonly used feature, so if it isn’t relevant to your workflow, it can be left blank. In cases where the ads need to be also placed in a secondary location, the duplication tab allows you to set up an additional target folder.
The two “Target” settings will tell Plan Integration what the duplicate target system is and where to place the ads when they come in from the source system.
The “Duplicate only these products” setting should be left blank if you wish to duplicate all products. If you only need a subset of the products, place the Product code in this field. If there are multiple products use a comma to separate them.
(See also Create file shortcuts in Target 2/Target 3 in NCS Content Target setup)
Miscellaneous


The miscellaneous tab holds additional settings that don’t fall under any of the other categories. None of these are required fields.
Preferred Units – This controls units used in various grids in Setup. When turning this on for the first time, you will need to logout/login again for setting to take effect.
Hover over column headings to see units when setting up grids:
And in the panels in Paginations:
Hide Ads Not in Running Order – In the past, Plan has always hidden ads that are not in the running order for a particular Plan. However, this has caused problems at some sites as ads booked to the wrong ‘section’ are mis-identified as being ‘lost’. With this version the default is switched so you always see all ads booked to a Plan and those that are ‘out of the running order’ are shown in the ad-list as outside of any classification. They can’t be automatically planned but can be manually placed. For those sites that prefer the old approach or have multiple running orders for the same products turn this on.
Purge plans older than this many days –This sets the number of days after which we should automatically purge older plans. So, if you set it to 365, only Plans older than a year will be deleted.
Year offset for testing – used for initial testing when no test server. Changing this will modify the year of any booking by this amount. ie -3 will change a booking for 1 Jun 2021 to 1 Jun 2018
New Plan naming – when a Plan is created by Integration it is given a default name. For some workflows this is not suitable so a naming setup, configured in the Naming Patterns tab can be used instead.
Use material id for PDF File Name – by default, Integration will use the line id of a booking to name the attached material (PDF). However, in some workflows using the material id is preferred. Use “on” to use material ids for PDF names. Depending on the content system integration this may reduce the number of pdf copies of the ad that will be stored on the server, so it is preferred by many.
Watched Editorial Folder – future feature – unused at the moment.
Rate size change tolerance – all ads have a booked (or rate) size which is the size of the ad that will be used. However, the actual size of the material (PDF) may differ which means the ad may be too small or large for its booked size, leading to empty space or overlapping ads. When a plan is opened, a warning is given when these two sizes do not match. This setting allows a tolerance (in points) below which the warning is not shown.
Scale to fit tolerance (0 to 100%) –In Naviga Plan, we deal with two sizes: The Booked Size and the actual Material Size. Ideally, these will always match, but sometimes they end up being different. This setting will scale oversized/undersized pdf’s to match the booking size within the defined tolerance allowed by the site. See Naviga Plan user guide to see how Plan handles various situations of mismatched sizes. NOTE: if you are using NCS Content as your editorial system, then the Scaling option must be turned on in Print Production in NCS Content, too.
Size Change action (default, remove, keep, rate) - Default: If any material PDF size is SMALLER than booked size: Show warning and ad is KEPT in Plan. If any material PDF size is LARGER than booked size: Show warning and ad is REMOVED from Plan. Remove: If any material PDF is SMALLER or LARGER than booked size: Show warning and ad is REMOVED from Plan. Keep: If any material PDF is SMALLER or LARGER than booked size: Show warning and ad is KEPT in Plan. Rate: If any material PDF is SMALLER or LARGER than booked size: Show warning, ad is KEPT in Plan using the booked ad width and height values.
Use Product in Ad Source Folder – some configurations have all the ad (material) PDFs in a single folder. Others subdivide the ads by product. Normally, this is not an issue but when generating PDFs, Plan needs the correct location of the source ad. If this field is set to true, Plan will append the product code onto the ad folder to find the ad.
Use Date in ad source folder - some configurations have all the ad (material) PDFs in a single folder. Others subdivide the ads by date. Normally, this is not an issue but when generating PDFs, Plan needs the correct location of the source ad. If this field is set to true, Plan will append the plan date onto the ad folder to find the ad.
Export to Print Production on Save – Default is "off". When set to “on” whenever you save a plan, it will automatically output the plan.
Export changed pages to Print Production - Default is "off". When set to “on” whenever you save a plan, it will automatically output the changes.
Days to keep log – By default, the integration log will save 30 days of integration logs. Enter a different number here to deviate from the default if 30 days is not desirable. (Keep in mind that if you have a large volume of ads, you might want a smaller number to reduce lag-time in reviewing the logs)
Zones use products – Normally when we use zones, we create versions of each Plan that corresponds with each zone. However, sometimes it’s required that each zone be its own product instead.
Hide page range (all or selected) – this hides the page range drop down in Plan’s output dialog and will force either ‘all pages’ or ‘selected’ pages.
Enable Bleed Auto Crop – allows automatic cropping of bleed ads on a spread. Eg. A spread has two full page bleed ads, one on the left & one on the right. Because they are bleed ads they will overlap into each other in the middle. This option will automatically crop both pages to the trim boxes so they don’t overlap.
Preview Size (DPI) - Default is 144, but can overwite if desired.
Block Path -
Port Naviga Ad Integration is using - Default is 33443, but can be changed if there is a conflict. Do not change without Naviga Hosting assistance/blessing.
Include reserved space in ads total -
Naviga Ad server username – Plan sends the location of all ads back to Naviga Ad every time a Plan is closed. Some configurations require a username/password for Plan to connect back to Naviga Ad.
Naviga Ad server password – see above.
Transfer log directory folder – Integration keeps a log of every ad sent from Naviga Ad. This folder is normally in the same location as the application. However, sometimes for hosting reasons it is required to keep the log files in a different location.
Database Label - This will be displayed at the top browser tabs of Integration and setup as well as in Plan on the blank screen when user first logs in. It is used to help the user differentiate between the test and production systems.


Access Key / Tearsheet URL Base & Path - this all relates to using the Naviga Plan Tearsheet Automation. This is an add-on feature which requires a license from Naviga. Please see Support or you Implementation Specialist for assistance with setting these fields. (Naviga Personnel - please see internal documentation site for details on setting this up)
Include Product with Zones - This is used in conjunction with "Zones use products" setting. If Zones use products is set to yes, likely this will also be desired to be yes. This is the setting that will create a 0 version (parent or base) plan in the situation where zones make products.
Custom
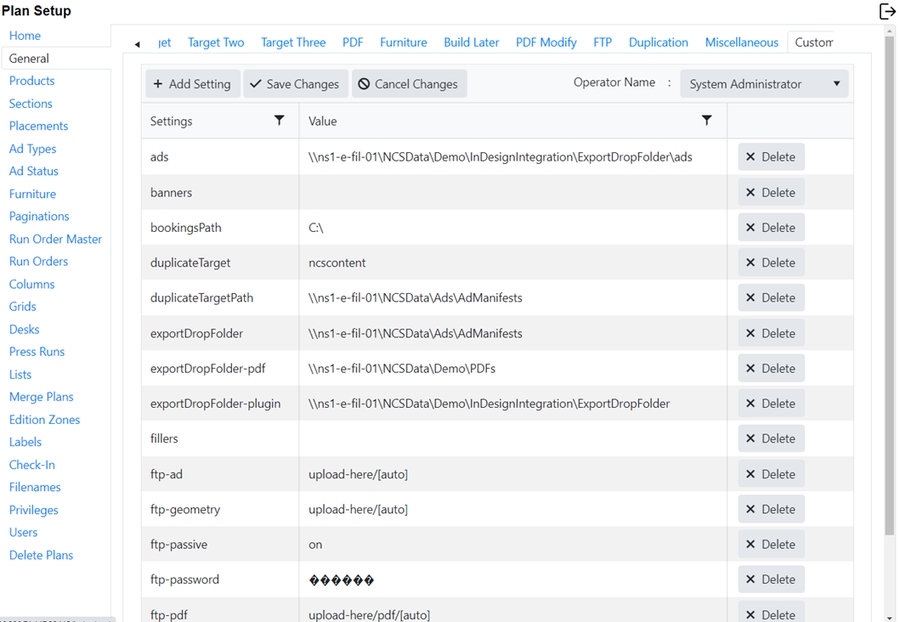
This is a screen used by Naviga support to see all the settings of the general screens together as one list. It is important to select “system administrator” or “npadmin” as the operator’s name when configuring these settings unless instructed otherwise by Naviga support and implementation.
Last updated
Was this helpful?