
Paginations
Paginations tell Plan what the rules are surrounding your ads. It also tells Integration what Grid size is used for any given section when the order comes in from order entry. Paginations can be shared among different Products if they have the same grid sizes and follow the same rules for flowing and stacking ads.
To create a new pagination:
click Add New Record at the top
A blank row will appear at the top of the screen.
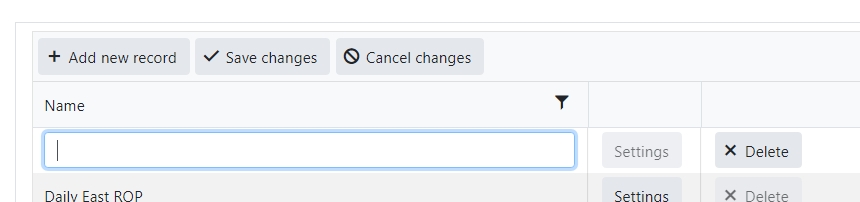
Enter name of the Pagination
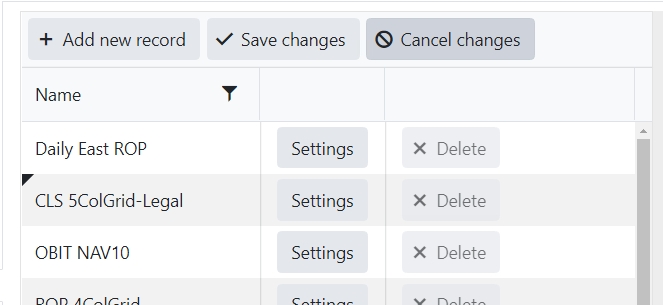
Click Save changes to save new record
Click Cancel changes to abandon changes
Note: A black triangle will appear in the top left corner of the name if you have not yet saved your change.
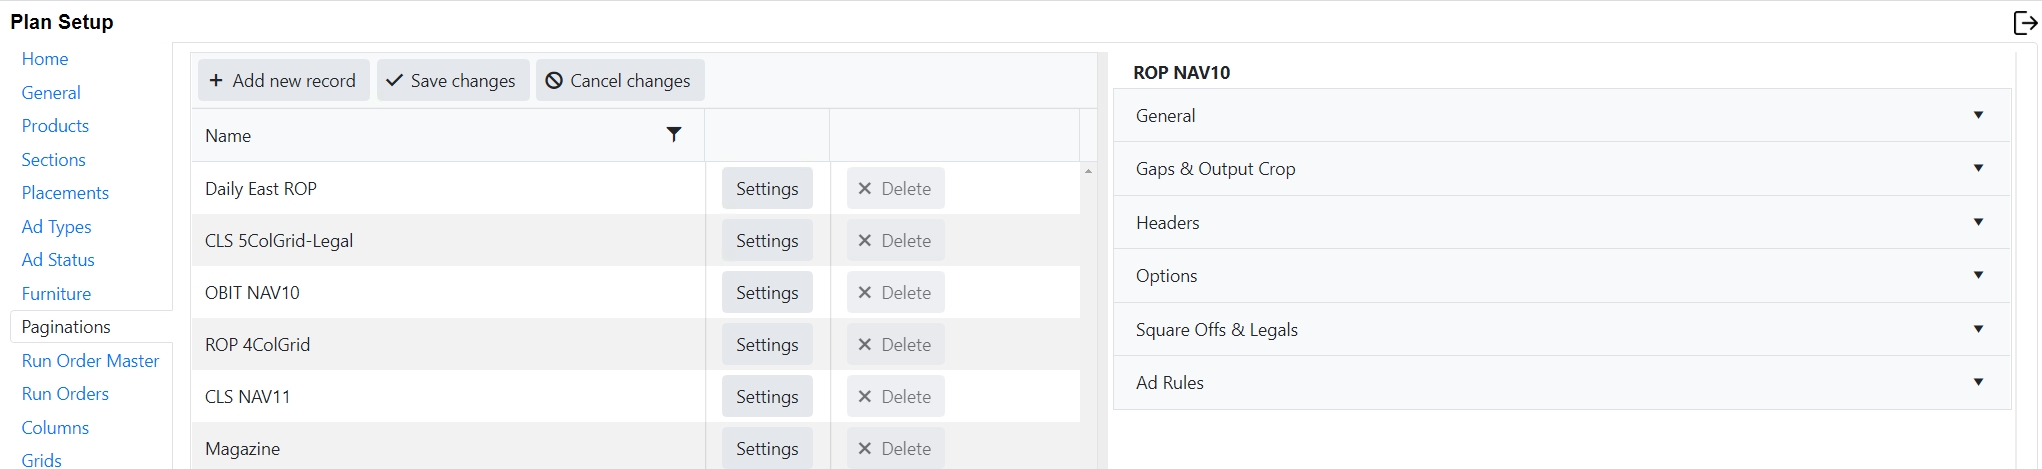
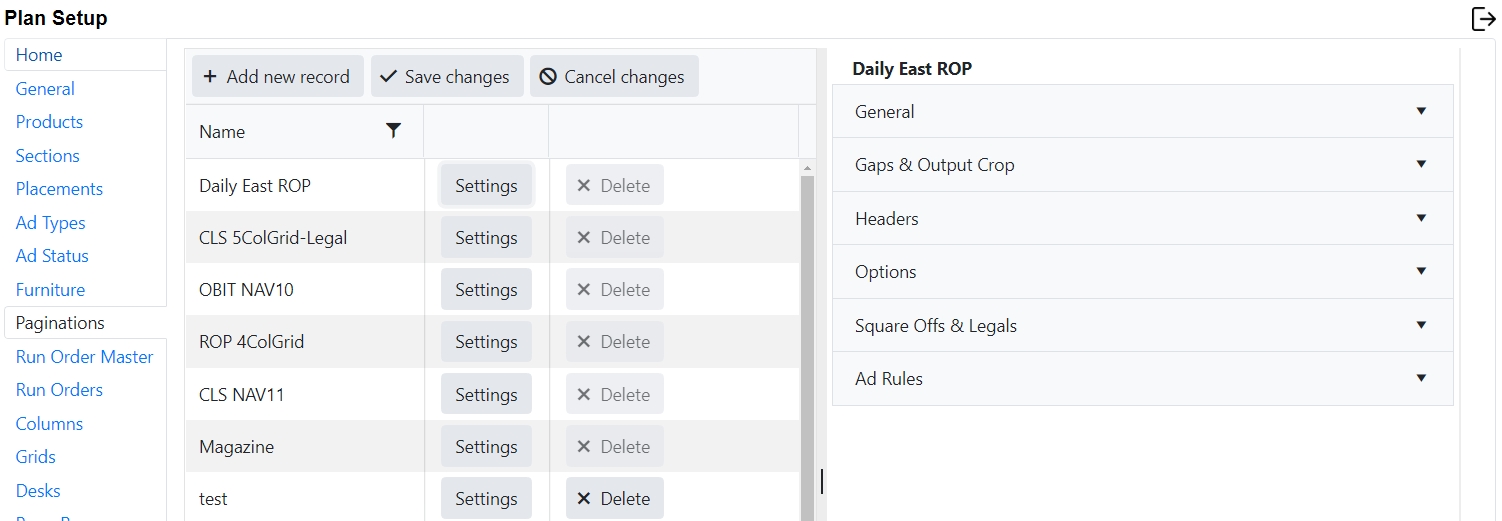
Click the Settings box on the pagination you would like to set up or edit.
The pagination name will appear at the top of the right panel when you are in edit mode for that pagination.
General
Planning Style
Planning Style will tell Naviga Plan how to flow Classified ads. If it is a Display ad pagination rule then simply select Run of Paper from the drop down and plan will look instead at the “Layout Style” to determine how to stack the ads.
Planning Style
Description
Run of
Paper
Distributes display ads among all pages defined as Run of
Paper. This option also displays all ROP (Run of Paper) ads in the same color.
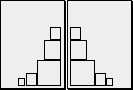
Classified Top Down
Stacks display ads at the top of their assigned classified category. Liners flow beneath the display ads according to the sort order you select for classifications.
Note: This planning style is a European style.
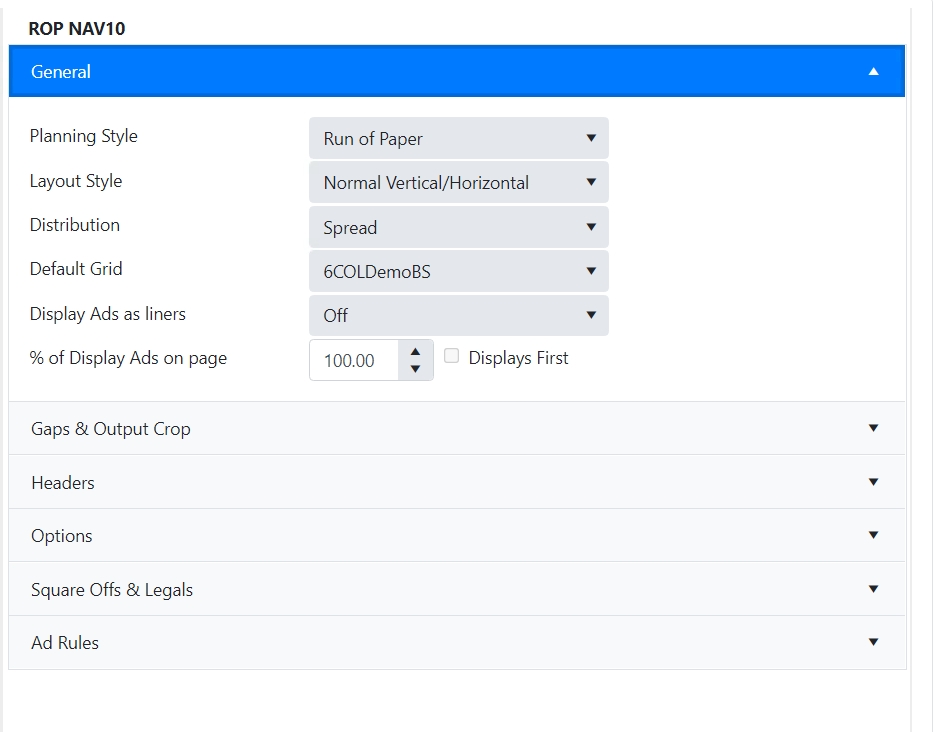
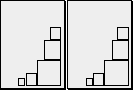
This example of Classified Top-Down planning style shows the flow of display ads and liners for three possible classifications
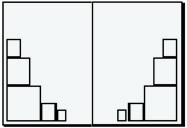
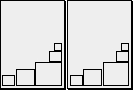
Classified Down Up
Stacks display ads at the bottom of the page, as close to their Classified category as possible. Liners flow above the display ads according to the sort order you select for the class.
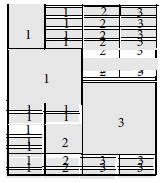
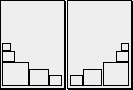
This example of Classified Down Up planning style shows the flow of display ads and liners for three possible classifications.
Left Right
Sort ads of the same size across the page from left to right.
Important: Only use this option if every ad is the same size. Traditionally this is used for display ads, such as a block of real estate display ads. It can also be used for liners, such as for tabular‐layout ads.
Note: The look ahead feature is disabled when using this planning style since the ads are expected to be the same size…there is no reason to look ahead for a better fit.
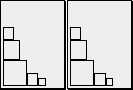
Classified Up Down
Stacks display ads at the top of the page, as close to their classification. as possible. Liners flow below the display ads according to the sort order you select for classifications.
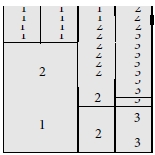
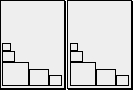
This example of Classified Up Down planning style shows the flow of display ads and liners for three possible classifications
Left Right Uneven
Similar to ‘left right’ above but the ads can be different sizes. Works best when ad heights are multiples of each other. Ie 1/8 page, ¼ page, ½ page, full page.
Note on using this: the sort text will be replaced with a width size code, followed by a depth size code, followed by the client’s name. This will sort similarly sized ads together to allow for better left-right flowing of the ad. The ads will no longer be in alpha order with this planning style, but rather sorted according to size.
Layout Style
If the planning style is ROP, the layout style will tell Plan how to stack the display ads. This can be overridden in Plan by the planner, but what is set here will be the default.
Layout Style options
Layout Style
Example
Effect
Normal V‐H
Naviga Plan places the largest ad in the bottom‐outside corner of each page and then stacks the next largest ads on top, diminishing in size toward the top of the page. Remaining smaller ads are placed across the bottom, diminishing in size toward the bottom‐inside corner of the page.
Reverse V‐H
Naviga Plan places the largest ad in the bottom‐inside corner of each page and then stacks the next largest ads on top, diminishing in size toward the top of the page. Remaining smaller ads are placed across the bottom, diminishing in size toward the bottom‐outside corner of the page.
All Left V‐H
Naviga Plan places the largest ad in the bottom‐left corner of each page and then stacks the next largest ads on top, diminishing in size toward the top of the page. Remaining smaller ads are placed across the bottom, diminishing in size toward the bottom‐right corner of the page.
All Right V‐H
Naviga Plan places the largest ad in the bottom‐right corner of each page and then stacks the next largest ads on top, diminishing in size toward the top of the page. Remaining smaller ads are placed across the bottom, diminishing in size toward the bottom‐left corner of the page.
Normal H‐V
Naviga Plan places the largest ad in the bottom‐outside corner of each page and then places the next largest ads across the bottom, diminishing in size toward the inside corner of the page. Remaining smaller ads are stacked on top of the largest ad, diminishing in size toward the top of the page.
Reverse H‐V
Naviga Plan places the largest ad in the bottom‐inside corner of each page and then places the next largest ads across the bottom, diminishing in size toward the outside corner of the page. Remaining smaller ads are stacked on top of the largest ad, diminishing in size toward the top of the page.
All Left H‐V
Naviga Plan places the largest ad in the bottom‐left corner of each page and then places the next largest ads across the bottom, diminishing in size toward the right corner of the page. Remaining smaller ads are stacked on top of the largest ad, diminishing in size toward the top of the page.
All Right H‐V
Naviga Plan places the largest ad in the bottom‐right corner of each page and then places the next largest ads across the bottom, diminishing in size toward the left corner of the page. Remaining smaller ads are stacked on top of the largest ad, diminishing in size toward the top of the page.
Distribution
There are two options under Distribution. The setting here will determine the default, but it can be overridden by the planner from Naviga Plan.
Spread
Spread ads out evenly among all the pages in each classification, with a balanced appearance of large and small ads.
Packed
Flows all the large display ads toward the front of each classification, leaving room for liners in the back.
Default Grid
The default grid is selected from the dropdown. If you have not yet set up grids, you may save it with “none” selected and come back to it later. Not having a defined grid on the pagination is a common cause of ads not coming into the Plan during the initial setup and testing phase. To set up new grids, See Grids.
Display Ads as liners
Choices in this list are ‘off” or numbers 1-10. Normally display ads are treated differently to liners. However, this option allows display ads to be treated the same as liner ads. Ie. Setting the value to 2 will mean that any display ad that is 1 or 2 columns will run in order as if it is a linage ad.
% of Display ads on page
Enter the default % of ads on a page for the pagination style. This can be overwritten on the page template in Naviga Plan if that rule changes for different pages. Check Displays first to lay display ads down first.
Gaps & Output Crop

Gap settings tell Naviga Plan how much space to allocate above and below Liner ads, Display Ads, Fillers, Banners, and Headers. The values entered here are in points.
Output cropping is for automatically cropping a small amount from the top or bottom of an ad. This would be typically used to fit 2 half pages ads on a single page without resorting to scaling. The top and bottom values are how much to remove. The minimum & maximum values control when the cropping is applied. Only ads that have a height that falls between these two values will be cropped.
Headers
Headers are the category headers over each classified ad category. The rules set in here will influence how the headers behave when flowing classified ads.
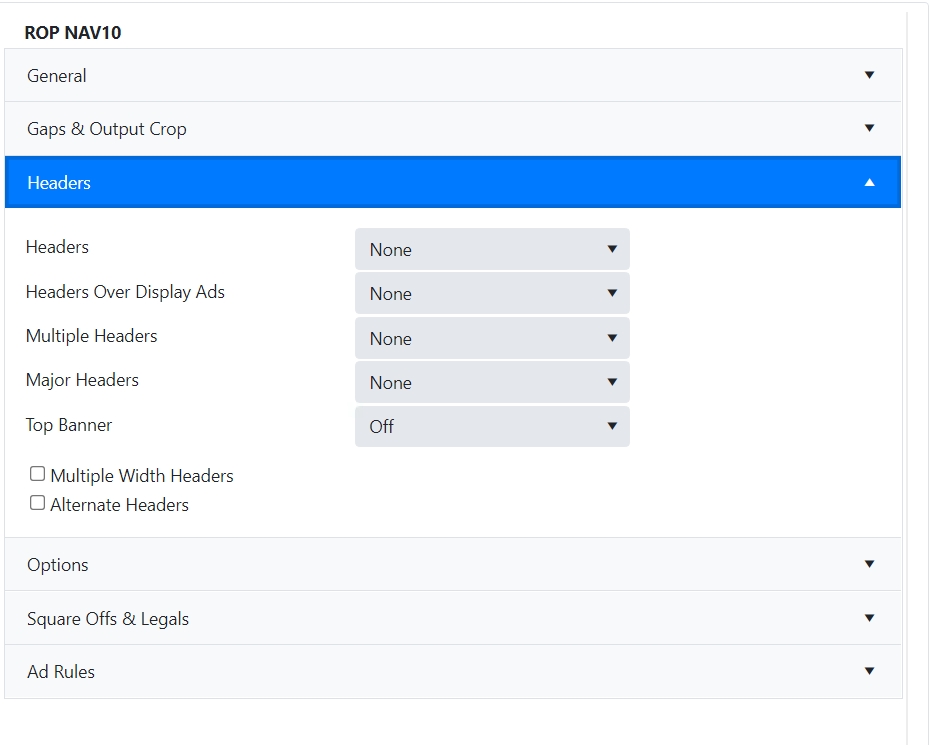
The Pagination Styles Override Headers panel
Item
Description
Headers
None
Headers will not appear above any classifications using this pagination style. Select this when you are using the Left Right planning style.
If needed
Headers will appear for each classification using this pagination style that has at least one ad.
Always
Headers will appear for any classification using this pagination style, even if there are no ads.
Headers over Display Ads
None
Headers will not appear above display ads for any classification using this pagination style.
Always
Headers will always appear above display ads for any classification using this pagination style.
As Required
Headers will not appear above display ads for any classification using this pagination style if they are run in their classification. Headers will appear above display ads if they are run in a different classification.
Multiple Headers
None
Places headers only over the beginning of each classification.
Single Header Over Every Column
Click if you want a single‐column classification heading to appear over every column of a classification. Uncheck if you want the heading to appear over only the first column of a classification. This feature is usually used to save newsprint.
Multiple Header Over Every Column
Click this button to combine multiple single‐column headers that belong to the same classification into one multiple column header.
Continuation Header
Click this button if you want a classified header repeated at the top of a subsequent page. This is usually used when a header is only placed at the beginning of each classification, rather than at the top of every column.
Major Headers
None
Major Headers will not appear above ads for any classification using this pagination style.
Always
Major Headers will always appear above ads for any classification using this pagination style.
As Required
Major Headers will not appear above display ads for any classification using this pagination style if they are run in their classification. Major Headers will appear above display ads if they are run in a different classification.
Top Banner
On
A top banner will appear at the beginning of ads for this pagination style.
Off
A top banner will NOT appear for this pagination style.
Repeating
A top banner will appear at the beginning of each page of ads for this pagination style.
Multiple Width Headers
Check this check box to allow multiple‐column headers.
Alternate Headers
Use Alternate Headers. Alternate headers are a type defined in Furniture. Alternate headers are used when a header is repeated on a second column (on the same or the next page) (For example, “Autos (cont.)”)
It is often desirable to have the parent “Classified” section as a different pagination than the actual Categories underneath. The “Classified” parent would have a banner but no headers and the sections under it would have headers but no banner.
Options
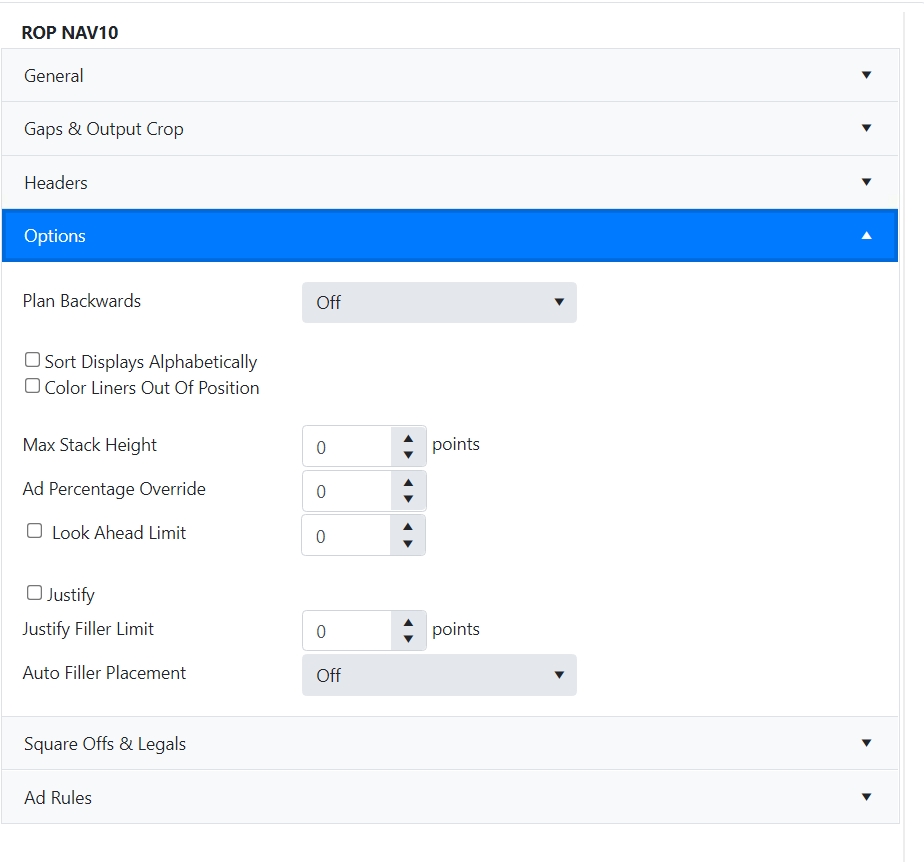
Backwards
Off
Select “off” to disable this option.
Height
Select Height if you want to plan the pagination style from back to front. Only use this pagination style for liners. This will leave a horizontal space at the beginning of the section, where the editorial department can place a story, or where you can place advertorial text.
Note: Using this option is often time consuming and difficult for the system.
Note: Plan Backwards only works if you do not plan ads again
Column
Select Column if you want to plan the pagination style from back to front. Only use this pagination style for liners. This will leave a Vertical space at the beginning of the section, where the editorial department can place a story, or where you can place advertorial text.
Sort Displays Alphabetically
Check to plan display ads in alphabetical order according to the sort text.
Color Liners out of Position
Check if you want a liner to run on a color page even if it runs in a different classification.
This option creates scatter ads in publications that run unrelated ads together. For example, an auto ad might run above a house‐for‐rent ad. This also has been known to sort ads by size rather than by sort text, so select it with caution.
Ad Percentage Override
The upper amount of space on a page that can be taken by display ads.
Look Ahead Limit
Plan sorts liners in a strict order. However, when placing an ad at the bottom of a column, this option allows a look ahead thru the subsequent ads in a class checking for a better fit. The value is between 0 to 5 that indicates how strict this rule is applied. 0 means pick the best fit. 1 means pick the best fit from ads with a sort field that starts with the same letter as the current ad. 2 means pick the best fit from ads with a sort field that starts with the same two letters as the current ad. This continues up to 5. Higher values should only be used if you have a good range of ads to pick from.
Justify
If enabled justify the ads at the end of each completed column of liners.
Justify Filler Limit
This controls whether a column of ads should be justified or not. It is a value of how much whitespace (ie. No ads) there is in a column in points. The larger the value (ie. closer to the height of the column) the more likely a column will be justified – but the gaps will be large. The smaller the value (closer to 0) the less likely to be justified.
Auto Filler Placement
Auto fillers can be turned off, placed at the top of the column, at the bottom of the column, or randomly throughout the column.
Notes on auto-fillers – An auto-filler will not be placed in the space left between a split ad and the bottom of the page. A user can place a manual filler in that spot if it is desired.
In earlier versions of plan, we also did not put auto-fillers in categories that only had one advertisement, but that restriction has now been removed.
Square Offs & Legals
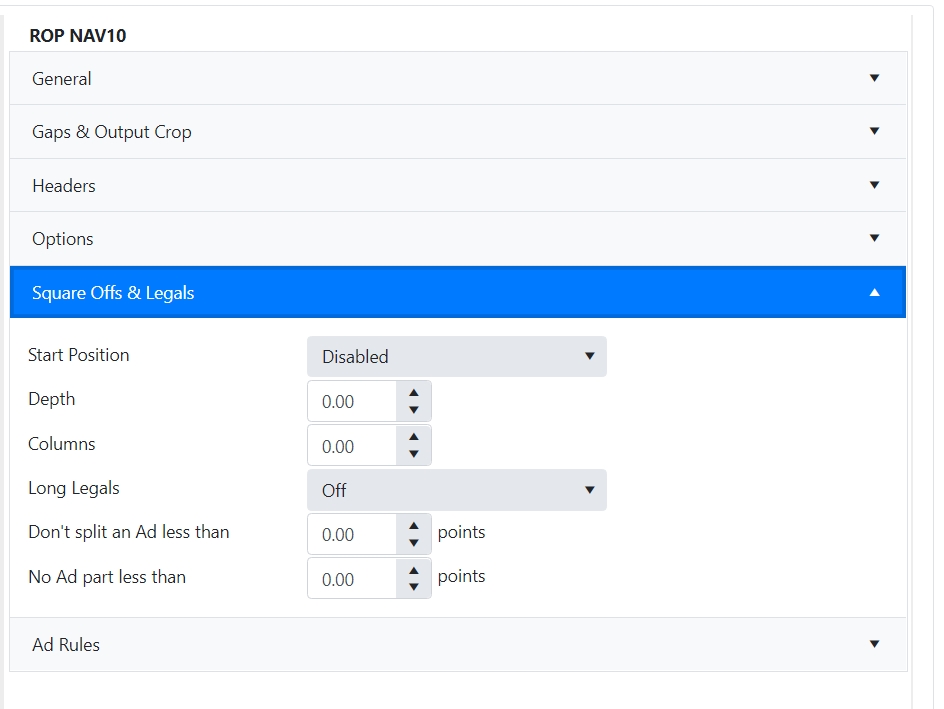
The square off and long legals options allows you to customize how these types of ads behave.
The first three choices are related to automatically squaring off a page. Choices under Start Position are Top Right, Top Left, Bottom Right, Bottom Left, or Disabled. When anything other than “disabled” is selected here, the ads will automatically be squared off on the page when the ads are placed. The user in Plan can change the position in Naviga Plan, but he cannot turn off Square-offs completely if they are set here in the defaults. For the most flexibility to the users, set this to Disabled here and let them decide what to do in Plan. If you always want to square off the ads, then it saves some time to set it here. Depth and Columns will be set to indicate if you always want the square-off to be a certain depth and/or number of columns. For example, if I always want the square-off to be over 6 columns and to use whatever depth is needed based on ad volume, then set this to 6 columns and leave depth at 0. Columns are in number of columns format, depth is in Points.
For long legals, the choice is off or on. If set to on, then long ads can be split over multiple columns. (This does not have to be restricted to just the legal category. It is just called Long Legals because that is where it is commonly found. Technically, Plan can split an ad in any category if you allow it). The next two settings tell Plan (in points) how small is too small to allow splitting, and the minimum size for any portion of a split ad.
Long Legals must be set to “off” if you are using NCS Content for Editorial. This is supported in InDesign. If using a 3rd party Editorial system, please consult with that system’s administrator to determine if splitting long classified ads is supported.
Ad Rules
Ad rules are lines between ads, or between ads and furniture. The settings here are in points indicating the thickness of the rule. If you do not wish to have a rule on any of these settings, leave the thickness at 0.00 points.
Shortest rule and nearest rule – Not yet implemented
yes/no flags to the right can be set as desired. Details on these are also included in the Running Order details in User Guide, Planning menu.

Last updated
Was this helpful?