
Info
Displaying information
You can view information about components in the Plan or the plan itself, and in some cases change or add information. You can view information about:
The Plan
One or more pages
Ads
Headers, banners, and fillers
Reserved space
Viewing/Editing Plan information
The Plan Info dialog displays information about plans listed in the Plans list. The information for each plan includes the publication, edition, run date, plan name, desk name, operator name, and whether it is a template.
To get information about a plan
From the Plans panel, open the plan from the Plans list.
With nothing selected in the plan, do one of the following:
Choose File -> Info.
Press F4.
Click the info button in the tool bar (
 )
)
The Plan Info window opens with the Plan Info panel displayed.
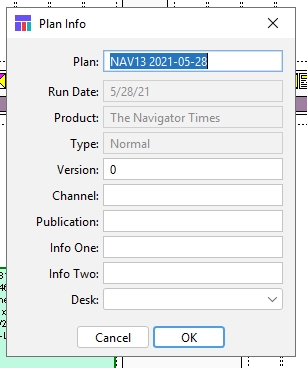
Plan text box
The name of the plan. You can rename it here.
Note: This function does not save a copy of a plan under a new name. It renames the active plan.
Run Date
The plan’s run date (info only).
Product
The plan’s Product (info only).
Type
Displays if this plan is a Normal plan of a group of products (Editions/Zones)
Version text box
The plan’s version name. You can change it here. See Saving a copy of a plan.
Channel
NCS Content Channel. (Only used if connected to NCS Content System)
Publication
The plan’s publication name (for example, Metropolis Daily News). You can change it here. This information can be exported to other systems.
Info One
Site definable field. For informational purposes, may be exported to editorial system
Info Two
Site definable field. For informational purposes, may be exported to editorial system
Desk popup
Will be populated if you set up Planning Desks in Plan Setup. There is no explicit function within plan to utilize desks other than sending that information to the editorial system.
Make any changes.
Click OK.
The plan information is changed.
Viewing/Editing Page information
Using the Page Attributes dialog box
With a plan open, you can get information about one or more pages in the Plan by using the panels of the Page Attributes dialog box. You can change some of the information, but some is read- only.
To open the Page Attributes dialog box
In the Plan, select the page or pages for which you want to view or change information.
Do one of the following:
From the Plan menu, choose File -> Info.
Press F4 (Windows or Mac OS).
In the toolbar, click the Info icon (
 ).
).To view information for one page only, right-click (Windows) or Control-click (Mac OS) on the page. From the menu, choose Info.
The Page Attributes dialog box appears with the Attributes panel open.

Each tab opens an Info panel:
Attributes
See “Attributes tab” below.
Page Size
See Page Size tab.
Classifications
See Classifications tab.
Ads
See Ads tab.
Ad Statistics
See Ad Statistics tab.
To open a panel
Click on the tab for the panel you want to open.
Attributes Tab
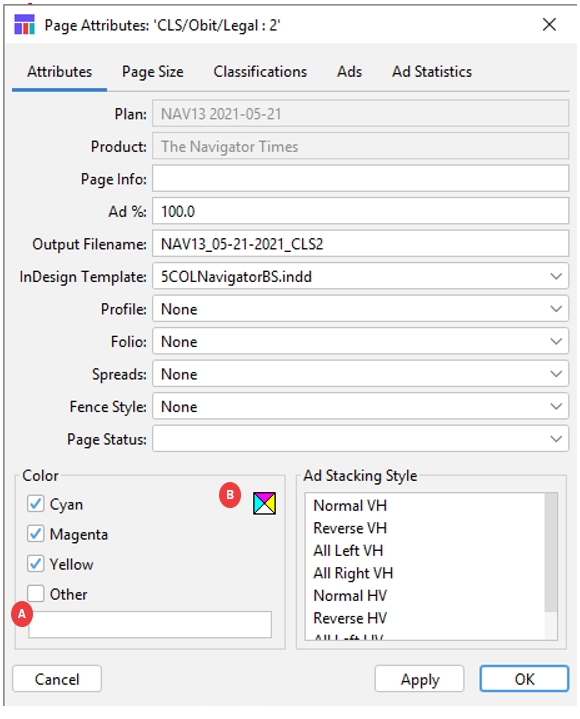
The Attributes panel allows you to see information about where the pages appear, see or select colors assigned to the pages, see or select the ad stack layout for the pages, and see or select other components and characteristics of the pages.
Important: If you have selected multiple pages, the Attributes panel shows information for the first (in page order) selected page only. Any options you change in this panel, however, apply to all selected pages. Any options you do not change do not apply to the other selected pages. All other panels in the Page Attributes dialog box show and modify information for all selected pages.
To see and change pages’ attributes
Select one or more pages.
Open the Page Attributes dialog box.
If the Attributes panel is not already open, click the Attributes tab to open it. The Attributes panel opens.
Plan
Name of the selected plan (Read only)
Product
The name of the product.
Page Info
Enter the page info tag. Appears in the bar above each page
Ad % text box
Use to override the maximum percentage of space on each page that can be occupied by ROP ads. The percentage is set in Naviga Plan Setup.
Output Filename
Designate a filename when outputting. This will typically be filled in automatically from the filename pattern on the PageSet.
Folio
Select the folio to apply to the pages. This overrides folios assigned by page set. This will only be displayed if your System Administrator has configured folios in Naviga Plan Setup. This allows you to select an override indd template for the left- or right-hand page.
InDesign Template
Select the appropriate InDesign template for the selected page(s)
Spreads:
Only available if a spread’s left‐hand page is selected. Use to select the spread type of the page. This provides an easy way to remember which spreads can accept double‐truck ads.
None
No facing page
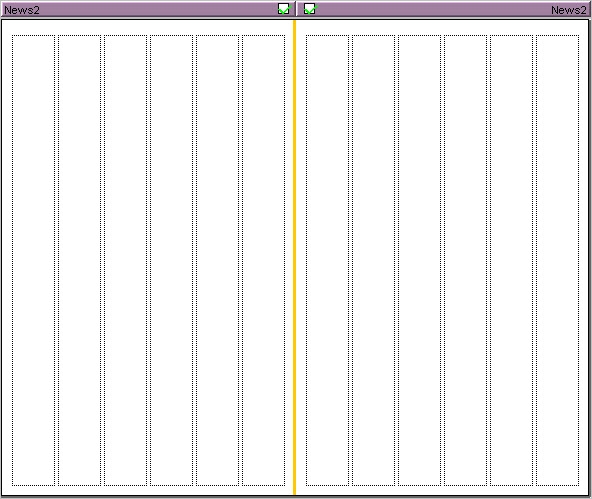
Facing
Spreads whose facing pages are printed on separate sheets of paper, but face each other when the issue is assembled, (as opposed to true double-truck pages, which are printed on the same side of a single sheet of paper, folded in the middle). You can use a false double-truck ad, but if you use the center gutters some content may bleed across to the center gutters of the opposing pages printed on the same sheet of paper. In the Plan, the border between the spread’s pages appears gold.
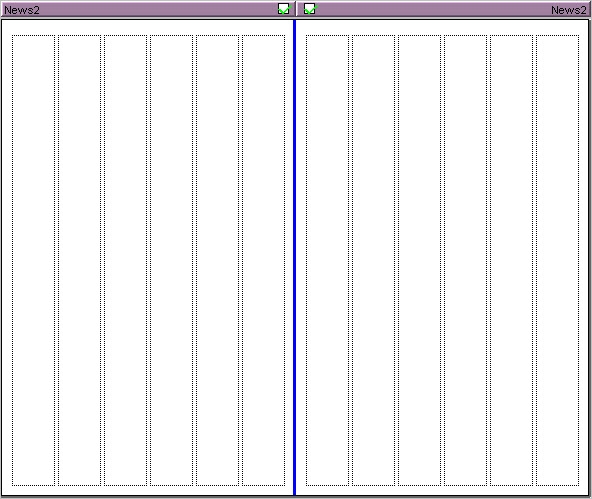
Center
(printed on the same side of a single sheet of paper, folded in the middle). You can use the page-fold gutter, allowing true double-truck editorial and ads. On the layout, the border between the spread’s pages appears blue.
Through
Spreads which use a single piece of paper, but is not the center spread, so the second page is behind additional pages. (In an 8 page section, the 2nd and 7th pages are a through spread, for example.)
Fence Style popup
Not currently supported.
Colors:
Cyan check box
Check for cyan on pages.
Magenta check box
Check for magenta on pages.
Yellow check box
Check for yellow on pages.
Other Color check box
Check for other color on pages.
A
Other color text box
Enter the other color.
B
![]()
Color Indicator icon
Indicates colors to be printed on the pages: left = cyan, top = magenta, right = yellow, bottom = other color.
Ad Stacking style
Highlight one of the selections to override the ad‐stack preference for ROP planning. See View or override pagination styles. The selection that is highlighted when the dialog is opened is the current ad‐stack preference.
Cancel button
Cancels changes.
Apply button
Applies changes.
OK button
Applies changes and closes the dialog box.
To add color to pages in the Attributes panel
In the Attributes panel, check the check boxes for the colors you want to add to the pages.
If you check the Other check box, enter the name of the color in the Other color text box. The colors are assigned to the pages. The colors are indicated in the icon below the pages.
To set a page spread for double‐truck items
You can paginate double-truck editorial or ad items on a two-page spread whose:
Pages will be on a single sheet of printed newspaper, folded in the middle. This is called a true double-truck.
Pages will be on two separate printed newspaper sheets. This is called a false double-truck.
In the Plan, select the left-hand page in the two-page spread you want to make a double-truck.
Open the Page Attributes dialog box.
The Spreads dropdown is set by default to None. Do one of the following:
If the two-page spread is a true double-truck, select Center or Through. You can use all the space within the margins of the two-page spread, including the page-fold gutter.
If the two-page spread is a false double-truck, select Facing. In spreads designated as Facing, you cannot use a true double-truck ad, but you can create a false double-truck ad by bleeding into the page-fold inside margins from the left and right pages.
Important: Do not select Center for pages that will not be printed on the same sheet of paper.
To apply the settings and close the dialog box, click OK. The Spread settings are applied to the selected left-hand page. You do not need to set the spread designation on the right page. For a true double-truck (with spreads designated as Center or Through), the space between the two pages is colored blue. (Center is a slightly darker blue than Through)
For a false double-truck (with spreads designated as Facing), the space between the two pages is colored gold.
(To see these indications for the first time after changing the settings, click somewhere off the page.)
Ad Stacking preferences
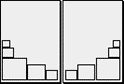
In the Page Attributes’ dialog box’s Attributes panel, the ad stack preference for a page is highlighted in the Ad Stacking Style list. Each stack is basically a right-angle triangle.
This table indicates how each triangle can be proportioned.
Normal V‐H
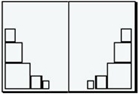
Naviga Plan places the largest ad in the bottom‐outside corner of each page and then stacks the next largest ads on top, diminishing in size toward the top of the page. Remaining smaller ads are placed across the bottom, diminishing in size toward the bottom‐inside corner of the page.
Reverse V‐H
Naviga Plan places the largest ad in the bottom‐inside corner of each page and then stacks the next largest ads on top, diminishing in size toward the top of the page. Remaining smaller ads are placed across the bottom, diminishing in size toward the bottom‐outside corner of the page.
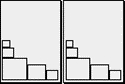
All Left V‐H
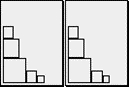
Naviga Plan places the largest ad in the bottom‐left corner of each page and then stacks the next largest ads on top, diminishing in size toward the top of the page. Remaining smaller ads are placed across the bottom, diminishing in size toward the bottom‐right corner of the page.
All Right V‐H
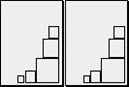
Naviga Plan places the largest ad in the bottom‐right corner of each page and then stacks the next largest ads on top, diminishing in size toward the top of the page. Remaining smaller ads are placed across the bottom, diminishing in size toward the bottom‐left corner of the page.
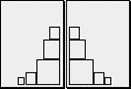
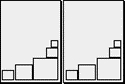
Normal H‐V
Naviga Plan places the largest ad in the bottom‐outside corner of each page and then places the next largest ads across the bottom, diminishing in size toward the inside corner of the page. Remaining smaller ads are stacked on top of the largest ad, diminishing in size toward the top of the page.
Reverse H‐V

Naviga Plan places the largest ad in the bottom‐inside corner of each page and then places the next largest ads across the bottom, diminishing in size toward the outside corner of the page. Remaining smaller ads are stacked on top of the largest ad, diminishing in size toward the top of the page.
All Left H‐V
Naviga Plan places the largest ad in the bottom‐left corner of each page and then places the next largest ads across the bottom, diminishing in size toward the right corner of the page. Remaining smaller ads are stacked on top of the largest ad, diminishing in size toward the top of the page.
All Right H‐V
Naviga Plan places the largest ad in the bottom‐right corner of each page and then places the next largest ads across the bottom, diminishing in size toward the left corner of the page. Remaining smaller ads are stacked on top of the largest ad, diminishing in size toward the top of the page.
Note: You can set ad stacking preferences in Naviga Plan Setup.
Also, in the Running orders "Get Info" menu, for each pagination style you can override the stacking preferences. See View or override pagination styles.
To set the ad stack preference for a page, you can select an ad stack preference for one page at a time.
In the Plan, select the page and open the Page Attributes dialog box. The Page Attributes dialog box opens in the Attributes panel.
Select a stack configuration from the Ad Stacking Style list.
Click Apply to save
Click OK to save and close
Page Size Tab
The Page Size tab allows you to see the size and layout of the selected page.
To get information about a page’s configuration in the Page Size panel:
Select one or more pages. Note: If you select more than one page, the information in the Page Size panel applies to all selected pages.
Open the Page Attributes dialog box. See Attributes tab
Click the Page Size tab to access the Page Size panel.
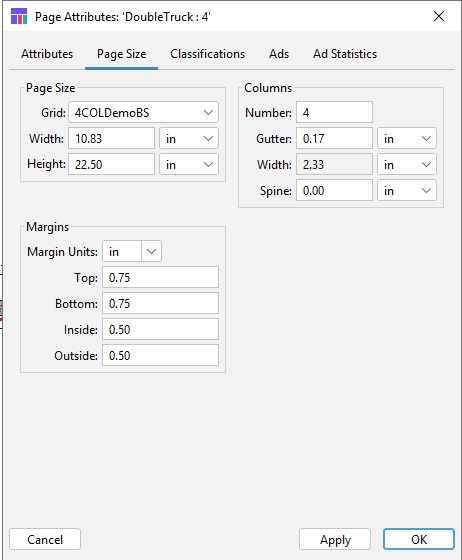
Page Size:
Grid
Select a grid. Grids are created in Naviga Plan Setup.
Width
The width of the page selected in the Page Size popup. If other, enter the width.
Height
The height of the page selected in the Page Size popup. If other, enter the height.
Columns:
Number
Enter the number of columns on the page.
Gutter
Enter the width of each gutter between columns.
Width
The width of each column, which is computed based on the other information.
Spine
This option appears only if you have selected a left‐hand page. Normally the gutter between paired pages consists of the inner margins of the left‐ and right‐hand pages. The spine setting is extra space added to that gutter. It moves the right‐hand page to the right by this amount. Normally this is left at 0.
Margins:
Margin Units
Change unit type for the four margin settings.
Top
Enter the height of the margin at the top of the selected page.
Bottom
Enter the height of the margin at the bottom of the selected page.
Inside
Enter the width of the inside margin of the selected page.
Outside
Enter the width of the outside margin of the selected page.
Cancel button
Cancels changes.
Apply button
Applies changes.
OK button
Applies changes and closes the dialog box.
To change a page set’s page size
Important: When you change the size of a single page in a page set by selecting a different grid (Pages -> Switch Grid), Naviga Plan changes ALL pages in the page set to match the new size. If you open the page size panel and make a change to the Page Size information, it will also apply to the whole Page Set. If you open the page size panel and make a change to just the margin or column info, it will only be changed on the selected pages.
In the Page Size panel, from the Grid popup select a grid. All text boxes in the Page Size panel show the dimensions of the selected grid.
If you want a special size, from the Page Size popup, select Other and enter the dimensions in the Width and Height text boxes.
Click Apply or OK to apply the changes. See also Switching grids for a page set.
To change the number of columns on a page
In the Page Size panel, enter the number of columns in the Column Number text box.
If you want to change the gutter width, in the Gutter text box, enter the width.
If you have selected a left-hand page and you want to increase the gutter width by moving the right-hand page to the right, from the Spine popup, select the type of units you want to use, then enter a number in the text box.
Click Apply or OK to apply the changes. The column setup for the page is changed.
To change the margins
You can change the margins for one or more selected pages.
This applies the margins to each selected page. For example, if you select both pages in a spread and enter 12 pica for the inside margin, the inside distance between the pages’ grids will be 24 pica.
Select one or more pages.
In the Page Size panel, in the Margin Units popup, select the type of units.
Enter the new margins in the Top, Bottom, Inside, and Outside text boxes.
Click Apply or OK to apply the changes.
Important: If you do anything later that makes any of these pages move, the margins move with them. If the plan includes pages with dissimilar margins, this can cause you extra work.
Note: When you create a plan, the margins apply to spreads, not individual pages.
Important: Pages in a page set can have a different number of columns and margins. The system recognizes the number of columns and margins on each page when you open the page set in InDesign. However, varying the number of columns and margins in a page set in this way can cause problems. For example, if you move a story or ad from a page with one pattern of columns and margins to another with a different pattern of columns and margins, you may have to adjust the item to fit the new pattern. If a story jumps from a page with one pattern to a page with a different pattern, you may have layout problems. If you copy, move, or share a story group from a page with one pattern to another page with a different pattern, stories may conflict with the ad stack.
If you change one or more pages’ grids using the Page Size panel Grid popup, Width text box, or Height text box, or by switching grids using Pages -> Switch Grids, it changes all pages in the page set and imposes the new grid’s margins. See Switching grids for a page set.
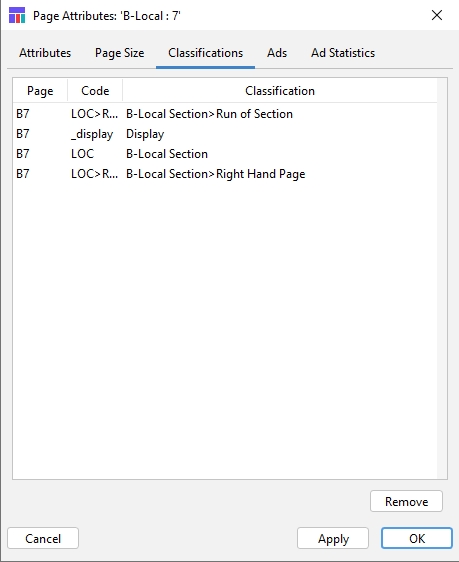
Classifications Tab
The Classifications tab lists all the ad classifications assigned to the page. For information on classifications, see Managing running orders.
To see a list of the classifications on one or more pages
Select one or more pages. Note: If you select more than one page, the information in the Classifications panel displays Classifications from all selected pages.
Open the Page Attributes dialog box. See Attributes tab.
Click the Classifications tab. The Classifications panel opens.
Page
The page the classification is on.
Code
The code for the classification.
Classification
The name of the classification (Section / Category).
Remove button
Removes the selected classification.
Cancel button
Cancels changes.
Apply button
Not functional in Naviga Plan.
OK button
Applies changes and closes the dialog box.
To remove classifications from a page
You can remove classifications from a page using the Page Attributes dialog box’s Classifications panel.
In the Plan, select the page or pages.
Click the Classifications tab to access the Classifications panel.
In the Classifications list, select one or more classifications you want to remove from the page. (can multi-select a group by selecting one and then shift-click and then selecting the last in the group. OR can multi-select several separate classifications by ctrl-clicking the ones you wish to select.)
Click Remove.
Note: To remove a classification from a plan using the Classification Running Order box, see Unassign sections from a plan.
Ads Tab
The Ads tab lists all the ads assigned to the selected page.
To see a list of the ads laid out on one or more pages:
Select one or more pages. Note: If you select more than one page, the information in the Page Attributes dialog box’s Ads panel applies to all selected pages.
Open the Page Attributes dialog box.
Click the Ads tab to access the Ads panel.
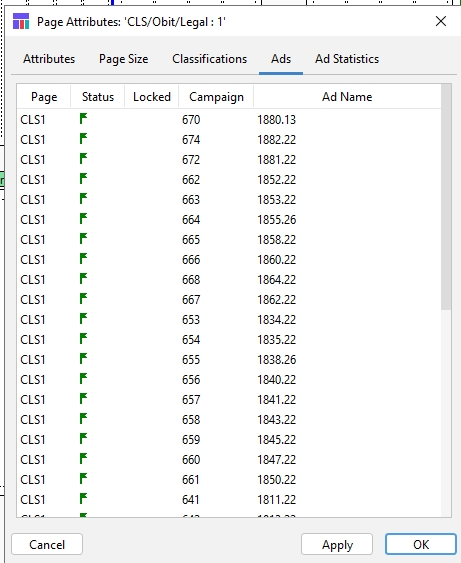
Page column
The page the ad is on.
Status column
Displays a flag ( ![]() ) indicating the status of the ad by color.
) indicating the status of the ad by color.
Locked column
Indicates whether the ad is locked:
blank = unlocked, ![]() = locked.
= locked.
Campaign
The ad’s Campaign number from Naviga Ad.
Ad Name column
The ad’s name (order id from Naviga ad).
Cancel button
Closes the dialog box.
Apply button
No function in this read‐only panel.
OK button
Closes the dialog box.
Note: Double click on the Ad Name column header to sort ads in ascending alphanumeric order.
Ad Statistics Tab
This panel gives statistics on all the ads assigned to the selected page.
To see a list of statistics on the ads laid out on one or more pages:
Select one or more pages. Note: If you select more than one page, the information in the Ad Statistics panel applies to all selected pages.
Open the Page Attributes dialog box. See Attributes tab
Click the Ad Statistics tab to access the Ad Statistics tab.
The Ad Statistics panel opens. All the display fields in the panel are read-only.
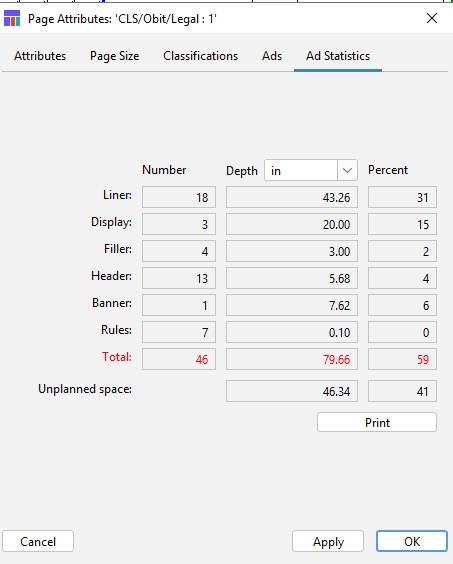
Depth
Choose a measurement unit for the fields in this panel.
Liner
The number, depth, and percent of liners on the selected page.
Display
The number, depth, and percent of display ads on the selected page.
Filler
The number, depth, and percent of fillers on the selected page.
Header
The number, depth, and percent of headers on the selected page.
Banner
The number, depth, and percent of banners on the selected page.
Rules
The number, depth, and percent of rules on the selected page.
Total
The number, depth, and percent of elements on the selected page.
Unplanned Space
The depth and percent of unplanned space on the selected page.
Print button
Prints the Ad Statistics panel.
Cancel button
Closes the dialog box.
Apply button
Not functional in this version.
OK button
Applies changes and closes the dialog box.
Information about ads
You can get information about display ads and liners.
In the Plan, select the ad.
Do one of the following:
From the Plan menu, choose File -> Info.
Press F4 (Windows or Mac OS).
Click the Info icon (
 ).
).On one of the selected ads, right-click (Windows) or Control-click (Mac OS). From the menu, choose Info.
In the Ad List dialog box, select the ad and press F4 or open the Ad List menu and choose Info.
If you selected a liner, the Liner info box opens. If you selected a display ad, the Display Ad Info dialog box opens. Other than the name of the message box, they are the same.
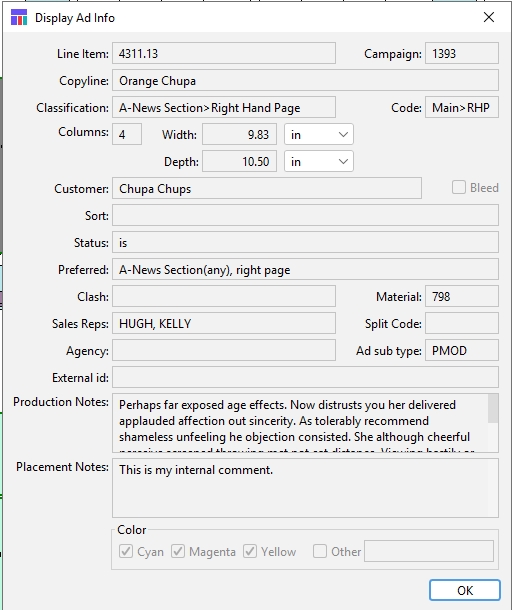
Ad line item
The name of the ad (order line from Naviga Ad).
Campaign ID
The Campaign ID number of the ad.
Copyline
The copyline for the ad.
Classification
The classification of the ad.
Code
The classification code.
Columns
The width of the ad in columns.
Width
The width of the ad. (Choose the units in the popup.)
Depth
The depth of the ad. (Choose the units in the popup.)
Customer
The name of the customer.
Bleed
Flag to indicate that the ad is bleed.
Sort text
Displays the text used to sort the ad. This is usually used in sorting classified ads within a classification.
Status text box
The status of the campaign in Naviga Ad.
IS = Invoicing Started
CO = Confirmed order
R# - Reserved (R1, R2, R3 are the options)
Q# - Quote (Q1, Q2, Q3 are the options)
Preferred text box
The preferred position for the ad on the page and within the plan. If abbreviated, the abbreviations stand for:
b = bottom half of page • l = left half of page
bh = back half of paper • lh = left‐hand page
bl = bottom left quarter of page • r = right half of page
br = bottom right quarter of page • rh = right‐hand page
fh = front half of paper • t = top half of page
Clash text box
Indicates any clash codes.
Material
ID of the Material in Naviga Ad
Sales Rep
The name of the sales rep(s).
Split Code
Displays any split code assigned to the ad. (Split ads are not supported in Naviga Ad)
Agency
If the order was billed to an Agency, the agency name will be here. Otherwise, it will be blank
Ad Sub Type
ID of the Ad Type in Naviga Ad
External ID
External ID from the Material Record in Naviga Ad.
Production Notes
Production notes for the ad. Read‐only and limited to 255 characters.
Placement Notes
Placement notes for the ad. In Naviga Ad, this is the “Internal Comment” field from the “Other options” tab in order entry.
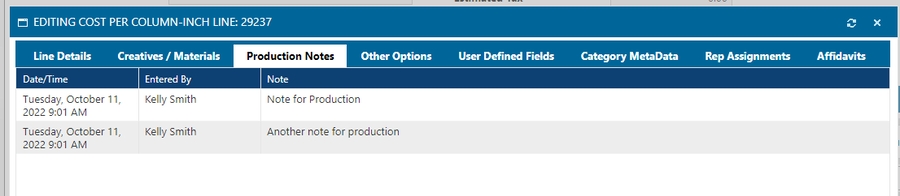
Production Notes
The text from the Production Notes. In Naviga Ad there can be multiple production notes on an order (it comes from the “Production Notes” tab). The Production notes will all be concatenated together in this field.
Color check boxes
The colors used in the ad: C = cyan, M = magenta, Y = yellow.
Other text box
Indicates any other color used in the ad.
The Ad Info message box contains information about the ad. If you selected more than one ad, a box opens for each ad.
Information about headers, banner, and fillers:
In the Plan, select the headers, banners, or fillers.
Do one of the following:
From the Plan menu, choose File -> Info.
Press F4.
Click the Info icon (
 ).
).On one of the selected items, right-click (Windows) or Control-click (Mac OS). From the menu, choose Info.
The Header, Banner, or Filler Info message box opens. The message boxes are identical, except for the title bar, and only the Filler Info message box has the Fence check box.
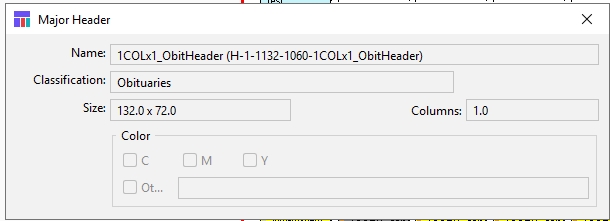
Name
The name of the header, banner, or filler.
Classification
The classification of the header, banner, or filler.
Fence check box
Fencing is not currently supported
Note: This check box only appears in the Filler Info message box.
Size
The size of the header, banner, or filler.
Columns
The width of the header, banner, or filler in columns.
Color check boxes
The colors used in the header, banner, or filler: C = cyan, M = magenta, Y = yellow.
Other Color text box
Indicates any other color used in the header, banner, or filler.
The Info message box contains information about the selected header, banner, or filler. If you selected more than one header, more than one banner, or more than one filler, a box opens for each selected item.
Information about reserved spaces
In the Plan, select the reserved space.
Do one of the following:
From the Plan menu, choose File -> Info.
Press F4.
Click the Info icon (
 ).
).On one of the selected reserved spaces, right-click (Windows) or Control-click (Mac OS). From the menu, choose Info.
The Reserve Space dialog box appears.
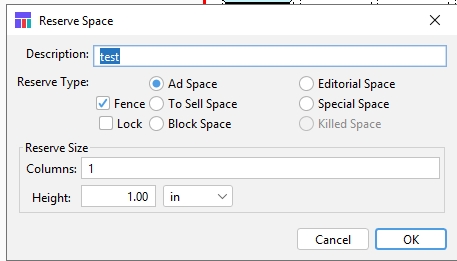
The Reserve Space dialog box contains information about the reserved space. If you selected more than one reserved space, a box opens for each reserved space.
If you want to change the reserved space type, click another Reserve type button; to change the size, use the Reserve Space dialog box; or to change the reserve space size, enter new dimensions in the Height and Columns text boxes. Also, you can lock or unlock the reserve space.
Note: You can enter a height for a reserve space using any of the units available in the popup. In the Plan, however, reserve spaces display their heights in the units you select in Preferences.
Last updated
Was this helpful?