
Open Existing or Creating New Plans
A plan cannot exist without a run date (the day the plan will be published).
From the standpoint of advertising, a new plan is automatically scheduled when the first ad is booked for a given product on a given run date. However, the plan has no pages in it until the first time it is opened. You “create” a plan when you open a scheduled plan for the first time.
Uncreated plans show up in the Open Plan window and show 0 pages in the Pages column.
When you open a plan, it opens in its own Naviga Plan window. You can open multiple plans and navigate between them using the "window" menu at the top of the screen.
Plans that have been opened and had a template applied have at least one page set and at least one page.
Note: You can also create scheduled editions by exporting (see Export Plans) or by merging (see Merge Plans)
For editorial purposes, you can create an unscheduled or “advance” plan (a plan for which no ads have been scheduled). This is a good way to prepare editorial content for future run dates for which no ads have been scheduled, or to prepare editorial content without disturbing a plan that contains ads and is intended for publication. See Creating a plan or template from scratch.
To open a Plan
In Naviga Plan, Do one of the following:
Choose File -> Open.
Press Ctrl-O (Windows) or Command-O (Mac OS).
The following dialog box appears:
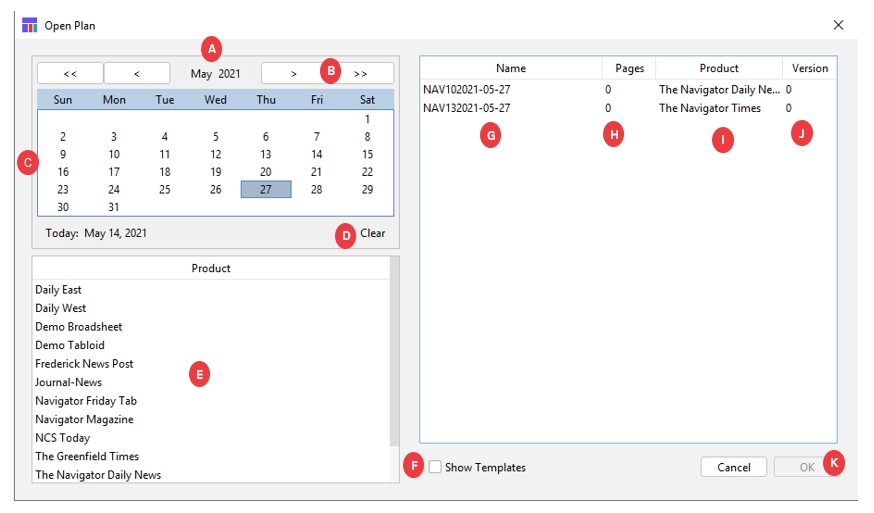
A
Month and Year popup
Click on the Month and/or year to pick from the popup list.
B
Next Month/Year
Use the single > to move to the next month or < previous month. Use the double >> to move to the next year or << previous year.
C
Day of Run date
After the desired month and year have been chosen, click on the day of the Run date.
D
Clear
Use the Clear option to the selection and return to the current Month and Year.
E
Filter by Product
If you have a long list of plans for a given date, select a Product to filter the results by that Product.
F
Show Templates
Tick the Checkbox to only show the Plan Templates for the selected date/Product.
G
Plan Name
Name of the Plan
H
Pages in plan
Number of created pages Plan. If 0, plan has not yet been worked on, but there are ads booked for that date.
I
Product
The Product the Plan belongs to. (NCS Content Channel)
J
Plan Version
The Version number of the Plan (or the Zone if using Zones)
K
Cancel or OK
Hit Cancel to close the Open Plan window. After selecting a Plan, hit OK to Open the Plan. (Or double‐click on the Plan Name.)
In the right panel of the above window, select the plan you want to open.
Double click the Plan or
Click the plan and then click ok
Opening the plan for the first time
If this is the first time opening the plan, the New Plan dialog box opens.
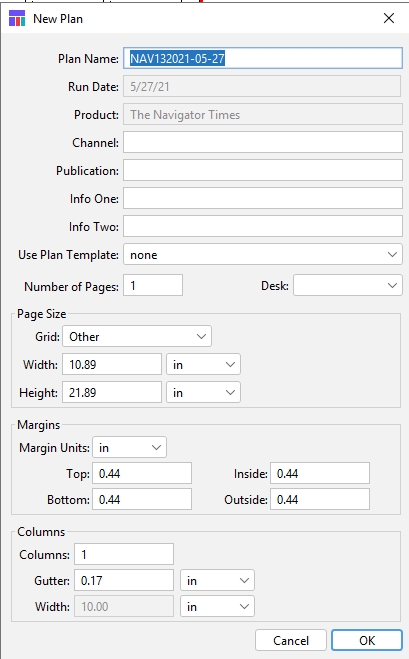
The New Plan dialog box:
Plan Name text box
The name of the selected plan. When you save a plan with a new name, you must follow your site’s naming conventions and observe technical restrictions on file names.
Run Date text box
Shows the run date. Read only.
Product text box
Displays the Product for this plan. Read only.
Channel text box
This will be populated based on the channel set in setup. It will only be used if your Editorial System is NCS Content.
Publication text box
Optional metadata. Enter the name of the publication, for example.
Info One/Two text boxes
Optional metadata. Labels can be changed in Setup if desired. This is sometimes used when outputting to another system.
Use Plan Template popup
Select a plan template. Select none to create a plan without a template. If you select a template, all other boxes in the New Plan dialog box become read‐only. See Creating a plan or template from scratch
Number of Pages text box
Shows the number of pages.
Desk
Optional. Used sometimes in NCS Content Implementations to indicate Planning Desk.
Grid
Use to select a grid. Grids are created in Naviga Plan Setup.
Width
The page width. Click the dropdown to change to pts, in, mm, cm, di, ci, or pica pts.
Height
The page height. Click the dropdown to change to pts, in, mm, cm, di, ci, or pica pts.
Margin Units
Click to select units for the margins: pts, in, mm, cm, di, ci, or pica pts.
Top text box
The top margin for each spread in the plan.
Inside text box
The total inside margin for each spread: The total inside distance between the grids of the two pages in a spread.
Bottom text box
The bottom margin for each spread in the plan.
Outside text box
The outside margins for each spread in the plan.
Columns text box
The number of columns on each page.
Gutter text box
The width of the gutter between columns. Click the popup to change to pts, in, mm, cm, di, ci, or pica pts.
Width text box
The width of one column. Click the popup to change to pts., in., mm, cm, di, ci, or pica pts.
Cancel button
Click to cancel changes and close the New Plan dialog box.
If you want to change the plan name, enter a new name in the Plan Name text box. Important: When you save a plan with a new name, follow your site’s naming conventions, and observe technical restrictions on filenames.
In the Use Plan Template, select a template or select “none” to design your own plan.
If you are designing your own plan, complete the information in the dialog box.
If desired, enter new margins. The margins apply to every spread in the plan, rather than the individual pages. Even if you enter different inside and outside margins and later do something that causes the pages in the plan to move to other spreads, the margins for each spread remain constant. This can save you time and effort since you no longer have to fix right- or left-page transposition problems. Important: The Inside margin is the total distance between the inside edges of the two grids in a spread.
Click Ok to close the New Plan dialog box and open the new plan.
The plan opens in Naviga Plan. You can have multiple plans open simultaneously.
Note: If you have designed your own plan, you can create a template from it. See Using plan templates
Re-opening a plan that has been opened before
Note: Plans that have a template applied show up in the Open Plans panel with more than 0 pages in the Pages column.
Open the Open Plans Panel and select a created plan.
Do one of the following:
Choose File -> Open Selected Plans.
Press Ctrl-O (Windows) or Command-O (Mac OS).
Double-click on the plan in the Plans list. The selected plan opens in its own Plan window. If a previously placed ad has been killed, you receive a warning:
 Click Print to Save the information for future action.
Re-opening one or more sections (pagesets) of a plan
Note: this procedure can only be used to re-open sections of a plan once the plan itself has been assigned a template first.
Open the Open Plans Panel and select a created plan.
Do one of the following:
Choose File -> Open Selected Plans.
Press Ctrl-O (Windows) or Command-O (Mac OS).
Select a plan in the list with a single mouse click.

In the lower left corner a list of pagesets will appear. Select one or more pagesets.
Click Column headers if desired to sort
To open a single pageset, double click on the pageset or single click and then click ok.
To open multiple pagesets, do one of the following and then click "open pagesets" button
Shift-click first and last option to open all in a list
Ctrl - Click (Cmd-Click) to select only what is being clicked.
Creating a plan or template from scratch
If no ads have been booked for an edition, you can create an unscheduled or “advance” plan from scratch in Naviga Plan. You can also create a template from scratch.
Do one of the following:
In Naviga Plan app, choose File -> New.
Press Ctrl-N (Windows) or Command-N (Mac OS).
The New Plan dialog box opens. It is similar to the New Plan dialog box that opens when you open a scheduled plan for the first time but thos one has a Set Run Date button.

The New Plan (from scratch) dialog box:
Plan Name text box
Enter the name of the template. When you save a template with a new name, follow your site’s naming conventions and observe technical restrictions on filenames.
Run Date text box
The run date. It will be populated when a run date is selected in the Set Run Date pop-up.
Set Run Date button
Click to set the run date and Product.
Product
The Product in which the plan will run. To modify, click Set Run Date.
Channel text box
This will be populated based on the channel set in setup. It will only be used if your Editorial System is NCS Content.
Publication text box
Optional metadata. Enter the name of the publication, for example.
Info One/Two text boxes
Optional metadata. Labels can be changed in Setup if desired
Use Plan Template popup
Click the popup to select another plan to use as a template. See Creating a plan or template from scratch.
Number of Pages text box
The number of pages.
Grid
Use to select a grid. Grids are created in Naviga Plan Setup.
Width
The page width. Click the popup to change to pts, in, mm, cm, di, ci, or pica pts.
Height
The page height. Click the popup to change to pts, in, mm, cm, di, ci, or pica pts.
Margin Units
Click to select units for the margins: pts, in, mm, cm, di, ci, or pica pts.
Top text box
Each page’s top margin size.
Inside text box
Each page’s inside margin size.
Bottom text box
Each page’s bottom margin size.
Outside text box
Each page’s outside margin size.
Columns text box
Number of columns on each page.
Gutter text box and popup
The width of the gutter between columns. Click the popup to change to pts, in, mm, cm, di, ci, or pica pts.
Width text box
The width of one column. Click the popup to change to pts., in., mm, cm, di, ci, or pica pts.
Cancel button
Click to cancel changes and close the New Plan dialog box.
OK button
Click to save the plan and open the Plan.
Enter a plan name in the Plan Name text box. Note: Your site should have a naming convention for plan templates that includes the day of the week, edition, number of pages, number of page sets, and so forth. Important: When you save a plan with a new name, you must follow your site’s naming conventions and observe technical restrictions on filenames.
Click Set Run Date.
The Run Date Calendar opens.
Select the product from the Product popup.
Note: Products are sorted alphabetically
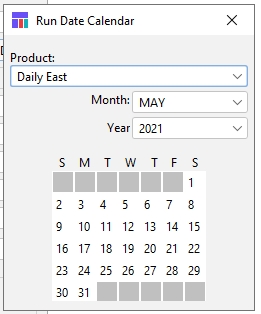
If you want to change the run date month, select the month from the Month popup.
If you want to change the year, select the year from the Year popup.
Do one of the following:
To save your changes and close the window, click on the run date day from the calendar.
To cancel your changes, just close the window.
Back on the the Use Plan Template popup, do one of the following:
Select a template.
Select “none” to design your own template. Important: The Use Plan Template popup includes any templates for the same Product.
If you are designing your own template, complete the information in the dialog box, including designating the number of pages, selecting a grid, defining the margins, and defining the columns.
Click Ok to close the New Plan dialog box and open the new plan.
Modify the plan, including the following:
Assign running orders. See Managing running orders.
Assign colors to the pages. See Adding color to a page.
Assign Page Sets to the pages. See Working with page sets.
Do one of the following:
To save the plan as an advance plan, click the save icon.
To save the plan as a template using Save A copy
Last updated
Was this helpful?