
 ) on the Route Service button bar to launch Distribution Maintenance. The parts of the interface are shown below.
 ) on the button bar.
* Enter filter criteria in the following fields and click OK.
) on the button bar.
* Enter filter criteria in the following fields and click OK.
| Field | Type | What to enter |
|---|---|---|
| TRUCK DEPARTURE | setup | Specify the truck departure you want to view. The truck departure is the order in which trucks depart from the loading dock. Truck departures are set up in Setup | Distribution | Truck | Truck Departure Sequence. |
| TRUCK SEQUENCE | setup | Specify the truck sequence you want to view. The truck sequence is the order, and from which truck, bundles will be dropped. Truck sequences are set up in Setup | Distribution | Truck | Truck Sequence. |
| EFFECTIVE DATE | date | Enter the effective date for which you want to view the truck departure and truck sequence. The effective date defaults to the maximum cut-off date of all the products in the truck sequence.
Note: Entering a date after the defaulted date turns off some functionality. Entering a date before the minimum cut-off date turns off most functionality. |
| REORDER DEP ORDER / RETAIN DEP ORDER | radio | If you want to allow the departure order to be modified while working with the truck tree (i.e., rearranging departure trucks), select Reorder Dep Order. If you select Retain Dep Order, you will not be permitted to change the order of departure trucks in the truck tree. You can change them using the Departure Order option, however. |
| DROP DESCRIPTION VISIBLE / ROUTE DESCRIPTION VISIBLE | radio | If you want the truck tree to show the drop location as the description of the drop, select Drop Description Visible. If you want the truck tree to show the route ID as the description of the drop, select Route Description Visible. |
| FULL DISTRIBUTION BUILD DEPARTURE DISTRIBUTION BUILD | radio | If you want to build the entire distribution tree, select Full Distribution Build. Using this build method, the act of expanding an object in the tree merely displays details that have already been loaded. If you want to build only the departure trucks and their potential drops, select Departure Distribution Build. Using this build method, the act of expanding an object in the tree causes the next level of detail to be loaded. |
| Icon | What it represents |
|---|---|
 | The root of the tree structure (the printing plant). It displays the truck departure name. Highlight this icon before you perform a text search of the entire tree. |
 | A truck that has no objects (drops, routes, or other trucks) within it. An empty truck. |
 | A truck that has objects (drops, routes, or other trucks) within it. |
 | A relay truck. |
 | A drop for multiple routes, multiple trucks, or a truck and a route. When a drop is for a single route or truck, no separate icon represents the drop—only the route or truck icon will be visible. |
 | A home delivery route. The route name will be bold and italicized if the route has an end date. |
 | A rack route. The route name will be bold and italicized if the route has an end date. |
 | A single copy route. The route name will be bold and italicized if the route has an end date. |
 | A split route (added to more than one truck in the same truck sequence). |
 | A throw-off subscription. |
 | A broken object (e.g., route or truck). |
 | An unknown route. |


| Button | Name | Use it to ... |
|---|---|---|
 | Find Trucks (Alt-Q) | Display a new truck tree by selecting a different truck departure, truck sequence, and/or effective date. |
 | Route Service (Alt-R) | Return to the Route Service interface. |
 | Account Inquiry (Alt-I) | Search for a carrier/dealer. |
 | Truck Sequence Export (Alt-E) | Export truck sequences. |
 | Truck Sequence Import (Alt-P) | Import truck sequences. |
 | Split Route Setup (Alt-L) | View a list of split routes that have been created, and modify order priorities and split draw quantities. |
 | Double (Alt-B) | Display a duplicate view of the current truck tree. This can be helpful when you are moving objects within a large tree. For example, if you want to move a route that is near the bottom of the tree to a position near the top, you could scroll down and click on the route in the truck tree, then drag it to its new position in the duplicate view of the tree. You can drag objects to, from, and within the duplicate view. |
 | Departure Order (Alt-O) | View and modify the departure order. You can modify the order by dragging one truck at a time to its new position. Or, you can use Ctrl-click or Shift-click to select multiple trucks to drag to a new position. |
 | Alternate Tree (Alt-2) | Show a different truck tree, side by side with the current tree. This option allows you to copy objects and groups of objects from one tree to another. The departure or sequence of the alternate tree must be different than the current tree. |
 | Backup (Alt-K) | Create a copy of a truck departure or sequence under a different name |
 | Add a Truck Record (Alt-M) | Add a truck record. |
| Button | Name | Use it to ... |
|---|---|---|
 | Search Trucks (Alt-F) | Search the entire truck tree, or a portion of it, for a specific text string (e.g., to locate a truck or route by ID). After finding a match, you can locate the next match by pressing F3. The scope of your search depends on what is highlighted in the truck tree when you click this button. If a truck is highlighted, only the objects within that truck are searched. If you want to search the entire truck tree, highlight the root icon before clicking this button. |
 | Add Route | Add a route or split route to the truck tree. When you click this button, a context menu appears that allows you to indicate where you want the route placed on the tree:
Note: You cannot add a route if the root icon is highlighted. |
 | Add Truck | Add a truck to the truck tree. When you click this button, a context menu appears that allows you to indicate the type of truck (departure or relay) and where you want it placed on the tree:
|
 | Delete Selected | Delete the highlighted object or objects in the truck tree. Multiple objects of the same type can be deleted at the same time.
You cannot delete objects that contain other objects. If you want to delete a truck, for example, you must delete all objects within it (starting at the lowest level) before you will be able to delete the truck. |
 | Toggle Future (Alt-G) | Toggles between the original tree, which displays records active on the effective date, to a similar tree that shows data active on or after the Effective Date. Records that have a future aspect (i.e., the Start Date or End Date is after the Effective Date) are shown in red italicized text. |
 ) on the button bar. A duplicate view of the truck tree appears in the right pane of the window. To hide the duplicate view, click the Double button again.

 ) on the button bar. The departure order is displayed in the right pane of the window.

 ) on the button bar.
* Enter the Truck Departure and Truck Sequence of the alternate tree. Either the departure or sequence of the alternate tree must be different than the current tree.
* Click OK. The alternate tree appears in the right pane of the window.
) on the button bar.
* Enter the Truck Departure and Truck Sequence of the alternate tree. Either the departure or sequence of the alternate tree must be different than the current tree.
* Click OK. The alternate tree appears in the right pane of the window.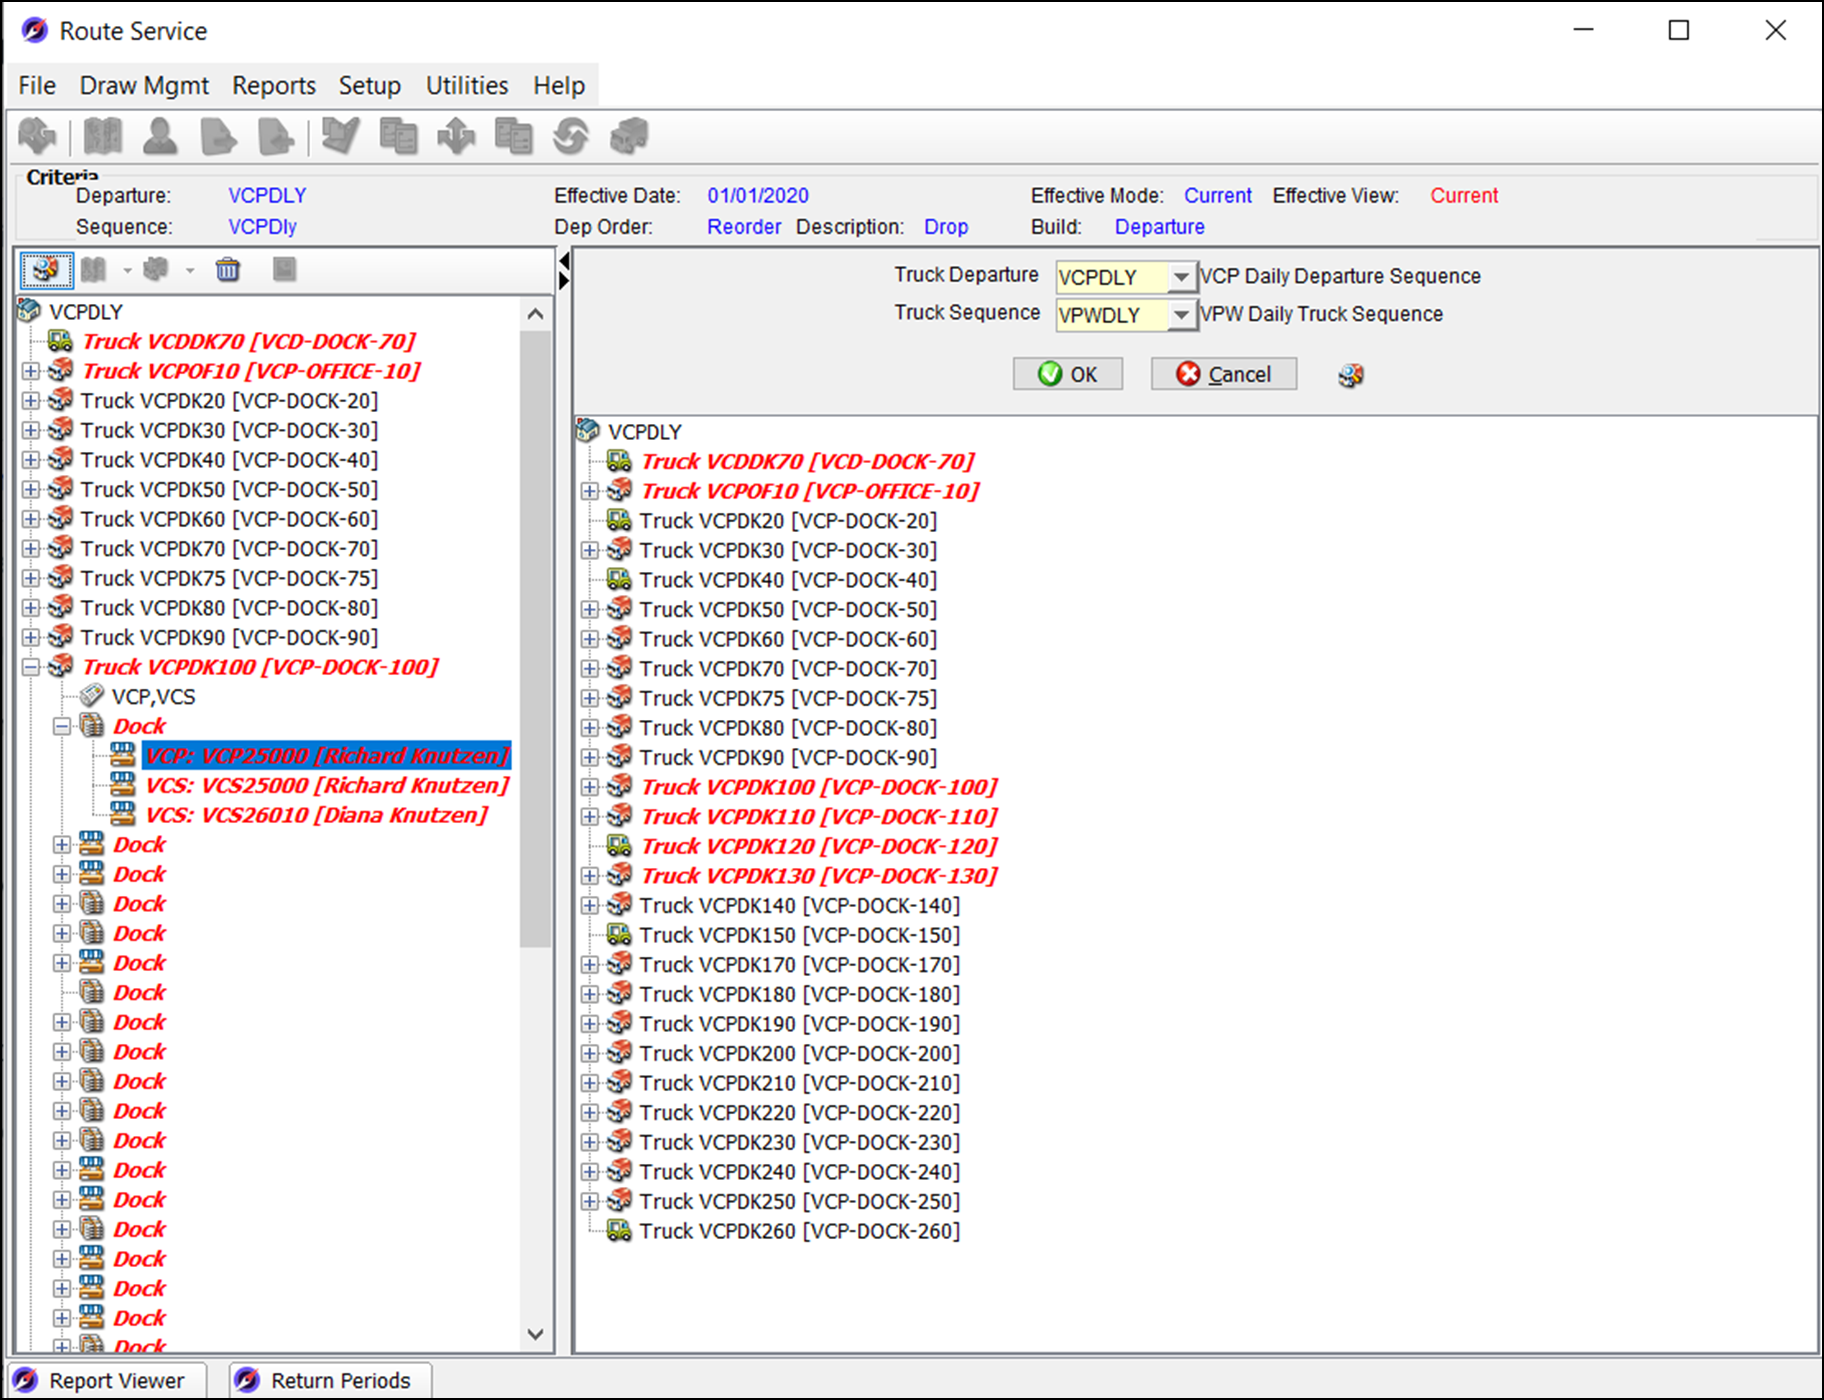
 ) and select the appropriate option from the menu. You can also right-click on the new route’s drop (or the drop just before it) and select Add Route in Drop or Add Route below Drop from the Add Route menu.
| Field | Type | What to enter |
|---|---|---|
| TRUCK | setup | This display-only field shows the ID of the truck to which you are adding the route. |
| PRODUCT | setup | Enter the product (usually a publication) that will be delivered on this route. |
| ROUTE | setup | Enter the route being dropped (home delivery or single copy). If dropping to a throw-off subscriber, leave this field blank. |
| SUBSCRIPTION | setup | If the drop is to a throw-off subscriber, enter the account number. Otherwise, enter zero. |
| DROP START DATE DROP END DATE | date | Specify the date range during which the drop is valid.
|
| ORIG START DATE CURR END DATE | date | Specify the date range during which this route is valid. The end date may be left blank. |
| BULK? | yes/no | Select this checkbox if the papers are delivered in bulk to the distribution point. Papers for all bulked routes on the truck will be bundled together, and the driver will count the papers for the route from the stack. In this case, a bundle top is not prepared for the route unless Key Only is selected. |
| KEY ONLY? | yes/no | Select this checkbox if you want to print bundle tops for key bundles only. If you do not check this box, bundle tops will be printed for all bundles. If you do not check this box, and the route has messages, a special bundle top will be printed that contains only messages. Otherwise, no corresponding bundle will be printed for the route (the truck will receive a truck-level bulk bundle). |
| STACKER DETAILS | yes/no | Select this checkbox if you wish to enter free-form details about the stacker. When you select this checkbox, the Stacker Details button becomes active. Click this button to display the Stacker Details window and enter information. |
| DROP WHERE | predefined | Indicate whether the drop will be made at the Account (carrier’s address), a location specified with the DistribPoint, or a Specific location. If you enter “specific”, the Drop Location field will remain active so you can specify the drop location. |
| DROP LOCATION | open | If you selected “Account” above, this will be the carrier’s address. If you selected “Specific”, this field will allow you to enter a specific drop location. If you selected “DistribPoint”, this will be the default drop location in the Distrib Point Publication record. |
| INSTRUCTIONS | open | Enter specific instructions about the drop. |
| MAP REFERENCE | open (4) | Enter a reference to a map on which this route can be found, if applicable. |
| NUMBER | open (4) | If you use map references, enter the number on the map where this route can be found, if applicable. |
| ORDER SPLIT DRAW | integer | If this route is a split route:
|
| Field | Type | What to enter |
|---|---|---|
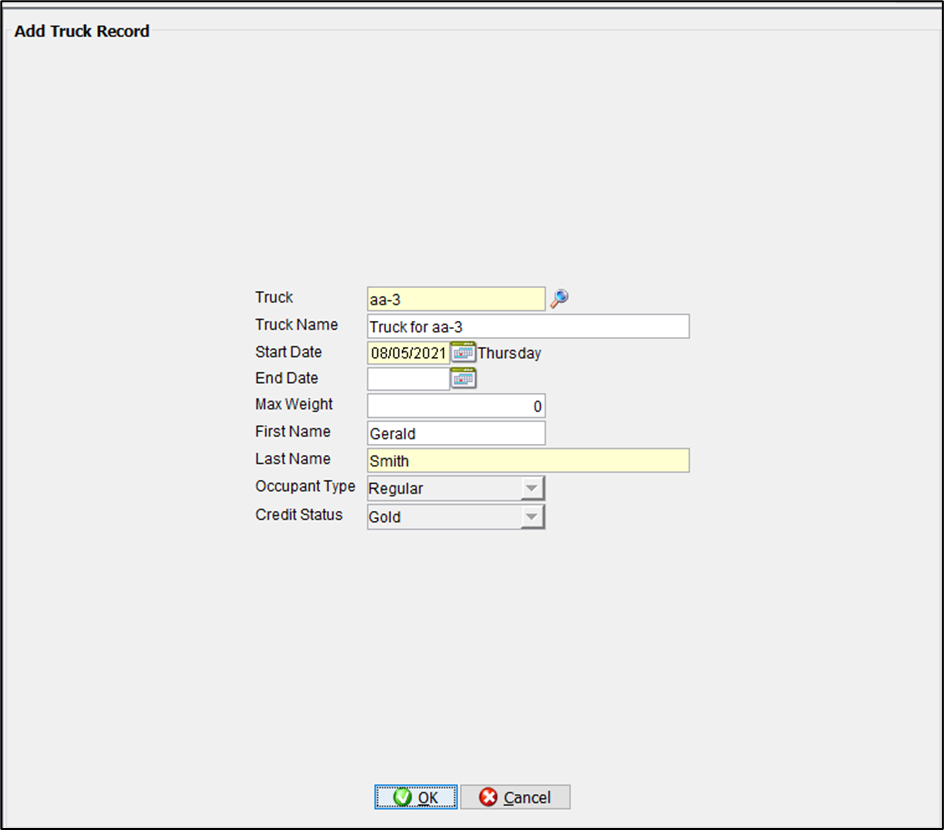
| TRUCK | open (8) | Enter a truck ID. |
| TRUCK NAME | open (20) | Enter a name describing this truck. |
| START DATE, END DATE | date | Enter a date range for this truck. The end date may be left blank. |
| MAX WEIGHT | decimal (10) | The maximum weight of this truck. |
| FIRST NAME | open (12) | Enter the driver’s first name. Note: An occupant record will be created for this driver. |
| LAST NAME | open (30) | Enter the driver’s last name. |
| OCCUPANT TYPE CREDIT STATUS | display | The default occupant type and credit status are displayed. Business Rules determine these defaults when adding an occupant record. |
| Field | Type | What to enter |
|---|---|---|
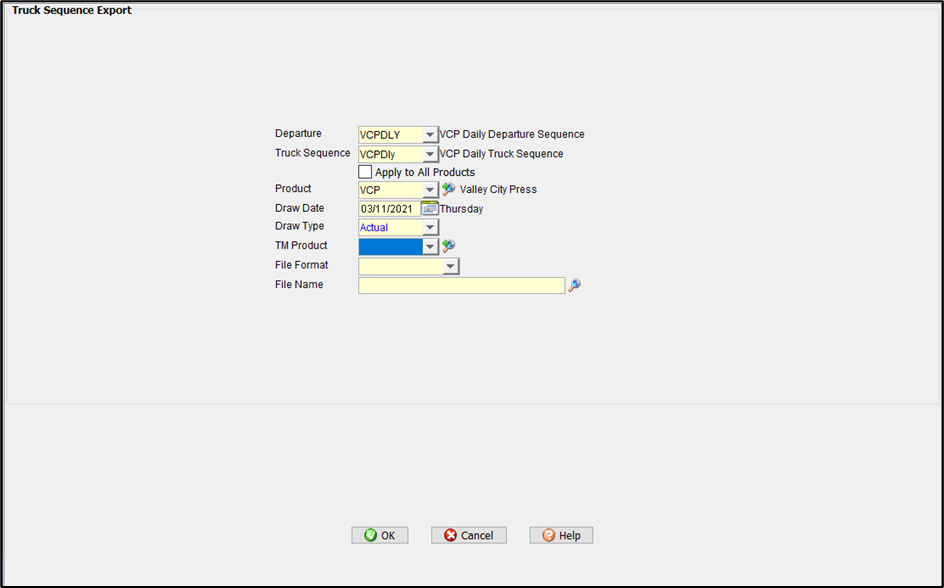
| DEPARTURE | setup | Enter the truck departure sequence. |
| TRUCK SEQUENCE | setup | Enter the truck sequence. |
| APPLY TO ALL PRODUCTS PRODUCT | yes/no | If you want this export to apply to all products. select this checkbox. Otherwise, select a product or products to include. |
| DRAW DATE | date | Enter the date for which draw figures should be exported. |
| DRAW TYPE | predefined | Indicate if actual, advance, pending draw should be exported. |
| TM PRODUCT | SETUP | Indicate which TM products you want to include in the export, if applicable. Valid TM products are based on the product(s) entered above. |
| FILE FORMAT | setup | Select the name of the file map you created for this purpose. |
| FILE NAME | open | Enter the name of the file to be exported, if different from the default. |

| Field | Type | What to enter |
|---|---|---|
| DEPARTURE | setup | Enter the truck departure sequence. It can be an existing departure sequence or a new one. |
| TRUCK SEQUENCE | setup | Enter the truck sequence. It can be an existing truck sequence or a new one. |
| EFFECTIVE DATE | date | Enter the date on which these records will become effective. |
| FILE FORMAT | setup | Select the name of the file map you created for this purpose. |
| FILE NAME | open | Enter the name of the file to be imported. |
 ) or another truck.
* Click the Add Truck button ().
* If you highlighted the root icon, select Add Departure Truck at Root from the context menu. If you highlighted another truck, select Add Departure Truck Below Departure Truck from the context menu.
) or another truck.
* Click the Add Truck button ().
* If you highlighted the root icon, select Add Departure Truck at Root from the context menu. If you highlighted another truck, select Add Departure Truck Below Departure Truck from the context menu.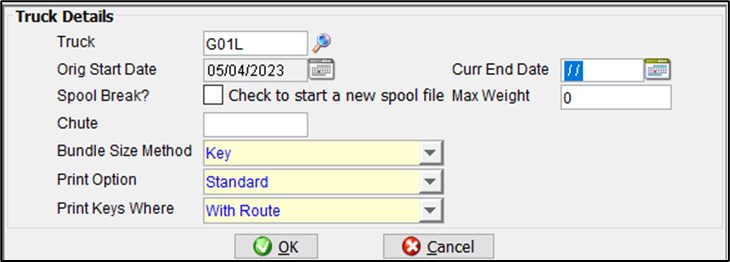
The chute ID can be exported to file-mapped stacker interface files. A site may use chutes as loading “lines” on the docks for their trucks.
Multiple chutes could be used to load trucks on one dock, for example, or a single chute could be used to load trucks on multiple docks.
Chutes could be numbered 1, 2, 3, etc., or A, B, C, etc. Chute (also known as dock) assignments can also be imported.
| | BUNDLE SIZE METHOD | predefined |Indicate whether the key or split key bundle size calculation should be used for this truck.
The “key” option will produce one key bundle, while the “split key” option will produce two key bundles (a key bundle is the odd-sized bundle in a group of standard bundles).
| | PRINT OPTION | predefined | Indicate whether *standard* or *key* bundles should be printed first. | | PRINT KEYS WHERE | predefined | Indicate whether *with route* or *end of truck* where keys should be printed | ### Add a Relay Truck To add a relay truck inside another truck: * In the truck tree, highlight an existing truck to which you want the new relay truck to be added. * Click the Add Truck button (). * Select Add Relay Truck In Departure Truck from the context menu.
| Field | Type | What to enter |
|---|---|---|
| TRUCK | display | This display-only field shows the ID of the truck to which you are adding the relay truck. |
| PRODUCT | setup | Specify the product delivered by this truck. |
| RELAY TRUCK | setup | Enter a truck ID or select one from the list. Trucks must be set up in advance . |
| DROP START DATE DROP END DATE | date | Specify the date range during which the drop is valid. • If you are adding a relay truck to an existing drop, these fields will be populated from the drop information and cannot be modified. • If you are adding a relay truck and creating a drop at the same time, the Drop Start Date will default from the Effective Date, and you can modify it. The Drop End Date may be left blank. |
| ORIG START DATE CURR END DATE | date | Enter the date range during which this truck can be used. You can leave the End Date blank. |
| SPOOL BREAK | yes/no | Indicate whether a new spool file should be created once this truck’s bundle tops have printed. Select this checkbox, for example, if you print bundle tops at more than one printer at the same time. |
| MAX WEIGHT | decimal (10) | The maximum weight of this truck. |
| CHUTE | open (1) | The chute ID can be exported to file-mapped stacker interface files. A site may use chutes as loading “lines” on the docks for their trucks. Multiple chutes could be used to load trucks on one dock, for example, or a single chute could be used to load trucks on multiple docks. Chutes could be numbered 1, 2, 3, etc., or A, B, C, etc. |
| BUNDLE SIZE METHOD | predefined | Indicate whether the key or split key bundle size calculation should be used for this truck. The “key” option will produce one key bundle, while the “split key” option will produce two key bundles (a key bundle is the odd-sized bundle in a group of standard bundles). |
| PRINT OPTION | predefined | Indicate whether standard or key bundles should be printed first. |
| PRINT KEYS WHERE | predefined | Indicate whether with route or end of truck where Keys should be printed |
| BULK? | yes/no | Select this checkbox if the papers are delivered in bulk to the distribution point. Papers for all bulked routes on the truck will be bundled together, and the driver will count the papers for the route from the stack. In this case, a bundle top is not prepared for the route unless Key Only? is selected. |
| KEY ONLY? | yes/no | Select this checkbox if you want to print bundle tops for key bundles only. If you do not check this box, bundle tops will be printed for all bundles. If you do not check this box, and the route has messages, a special bundle top will be printed that contains only messages. Otherwise, no corresponding bundle will be printed for the route (the truck will receive a truck-level bulk bundle). |
| DROP WHERE | predefined | Indicate whether the drop will be made at the Account (carrier’s address), a location specified with the DistribPoint, or a Specific location. If you enter “specific”, the Drop Location field will remain active so you can specify the drop location. |
| DROP LOCATION | open | If you selected “Carrier” above, this will be the carrier’s address. If you selected “Specific”, this field would allow you to enter a specific drop location. |
| INSTRUCTIONS | open | Enter specific instructions about the drop. |
| MAP REFERENCE | open (4) | Enter a reference to a map on which this route can be found, if applicable. |
| NUMBER | open (4) | If you use map references, enter the number on the map where this route can be found, if applicable. |